2. 正在将数据插入 Airtable#
¥ Inserting data into Airtable
在本工作流程步骤中,你将学习如何使用 Airtable 节点 节点将从“HTTP 请求”节点接收的数据插入到 Airtable 中。
¥In this step of the workflow, you will learn how to insert the data received from the HTTP Request node into Airtable using the Airtable node.
Spreadsheet nodes
你可以将 Airtable 节点替换为其他电子表格应用/服务。例如,n8n 还有一个用于 Google 表格 的节点。
¥You can replace the Airtable node with another spreadsheet app/service. For example, n8n also has a node for Google Sheets.
完成此步骤后,你的工作流应如下所示:
¥After this step, your workflow should look like this:
Workflow preview placeholder.
配置表格#
¥Configure your table
如果要将数据插入 Airtable,我们首先需要在其中创建一个表。执行此操作:
¥If we're going to insert data into Airtable, we first need to set up a table there. To do this:
- 在 Airtable 工作区中,从头开始创建一个新的数据库,并将其命名为例如“入门课程”。
¥In your Airtable workspace add a new base from scratch and name it, for example, beginner course.
1 | |
- 在入门课程基础版中,默认情况下,你会看到一个名为“表 1”的表格,其中包含四个字段:
Name、Notes、Assignee和Status。这些字段与我们无关,因为它们不在我们的 "orders" 数据集中。接下来我们来看下一点:Airtable 中的字段名称必须与节点结果中的列名称匹配。按以下步骤准备表:
¥In the beginner course base, by default, you have a table called Table 1 with four fields: Name, Notes, Assignee, and Status. These fields aren't relevant for us since they aren't in our "orders" data set. This brings us to the next point: the names of the fields in Airtable have to match the names of the columns in the node result. Prepare the table by doing the following:
-
将表格名称从“Table 1”重命名为“orders”,以便于识别。
¥Rename the table from Table 1 to orders to make it easier to identify.
-
删除默认创建的 3 条空白记录。
¥Delete the 3 blank records created by default.
-
删除
Notes、Assignee和Status字段。¥Delete the
Notes,Assignee, andStatusfields. -
编辑
Name字段(主字段),将其内容更改为orderID,字段类型为“数字”。¥Edit the
Namefield (the primary field) to readorderID, with the Number field type. -
请参考下表添加其余字段及其字段类型:
¥Add the rest of the fields, and their field types, using the table below as a reference:
| 字段名称 | 字段类型 |
|---|---|
orderID |
数字 |
customerID |
数字 |
employeeName |
单行文本 |
orderPrice |
数字 |
orderStatus |
单行文本 |
现在你的表应该如下所示:
¥Now your table should look like this:

现在表格已准备就绪,让我们返回 n8n 编辑器 UI 中的工作流。
¥Now that the table is ready, let's return to the workflow in the n8n Editor UI.
向 HTTP 请求节点添加 Airtable 节点#
¥Add an Airtable node to the HTTP Request node
添加一个连接到 HTTP 请求节点的 Airtable 节点。
¥Add an Airtable node connected to the HTTP Request node.
Remember
你可以通过选择现有节点旁边的“+”图标,添加一个连接到现有节点的新节点。
¥You can add a node connected to an existing node by selecting the + icon next to the existing node.
节点面板:
¥In the node panel:
- 搜索 Airtable
¥Search for Airtable. 2. 从“记录操作”搜索结果中选择“创建记录”。
¥Select Create a record from the Record Actions search results.
这将把 Airtable 节点添加到你的画布,并打开节点详情窗口。
¥This will add the Airtable node to your canvas and open the node details window.
在 Airtable 节点窗口中,配置以下参数:
¥In the Airtable node window, configure the following parameters:
- 用于连接的凭据:
¥Credential to connect with:
-
选择“创建新凭证”。
¥Select Create new credential.
-
保留默认连接方式:已选择访问令牌。
¥Keep the default option Connect using: Access Token selected.
-
访问令牌:请按照 Airtable 凭证 页面上的说明创建你的令牌。使用推荐的作用域,并添加对入门课程库的访问权限。保存凭据,完成后关闭“凭据”窗口。
¥Access token: Follow the instructions from the Airtable credential page to create your token. Use the recommended scopes and add access to your beginners course base. Save the credential and close the Credential window when you're finished.
-
资源:记录自定义实例设置。
¥Resource: Record.
- 操作:创建。此操作将在表中创建新记录。
¥Operation: Create. This operation will create new records in the table.
- 基础:你可以从列表中选择基础课程(例如,入门课程)。
¥Base: You can pick your base from a list (for example, beginner course).
- 表:订单。
¥Table: orders.
- 映射列模式:自动映射。在此模式下,传入的数据字段必须与 Airtable 中的列相同。
¥Mapping Column Mode: Map automatically. In this mode, the incoming data fields must have the same as the columns in Airtable.
测试 Airtable 节点#
¥Test the Airtable node
完成 Airtable 节点配置后,选择“执行”步骤来运行它。处理过程可能需要一些时间,但你可以通过在 Airtable 中查看数据库来跟踪进度。
¥Once you've finished configuring the Airtable node, execute it by selecting Execute step. This might take a moment to process, but you can follow the progress by viewing the base in Airtable.
你的结果应如下所示:
¥Your results should look like this:

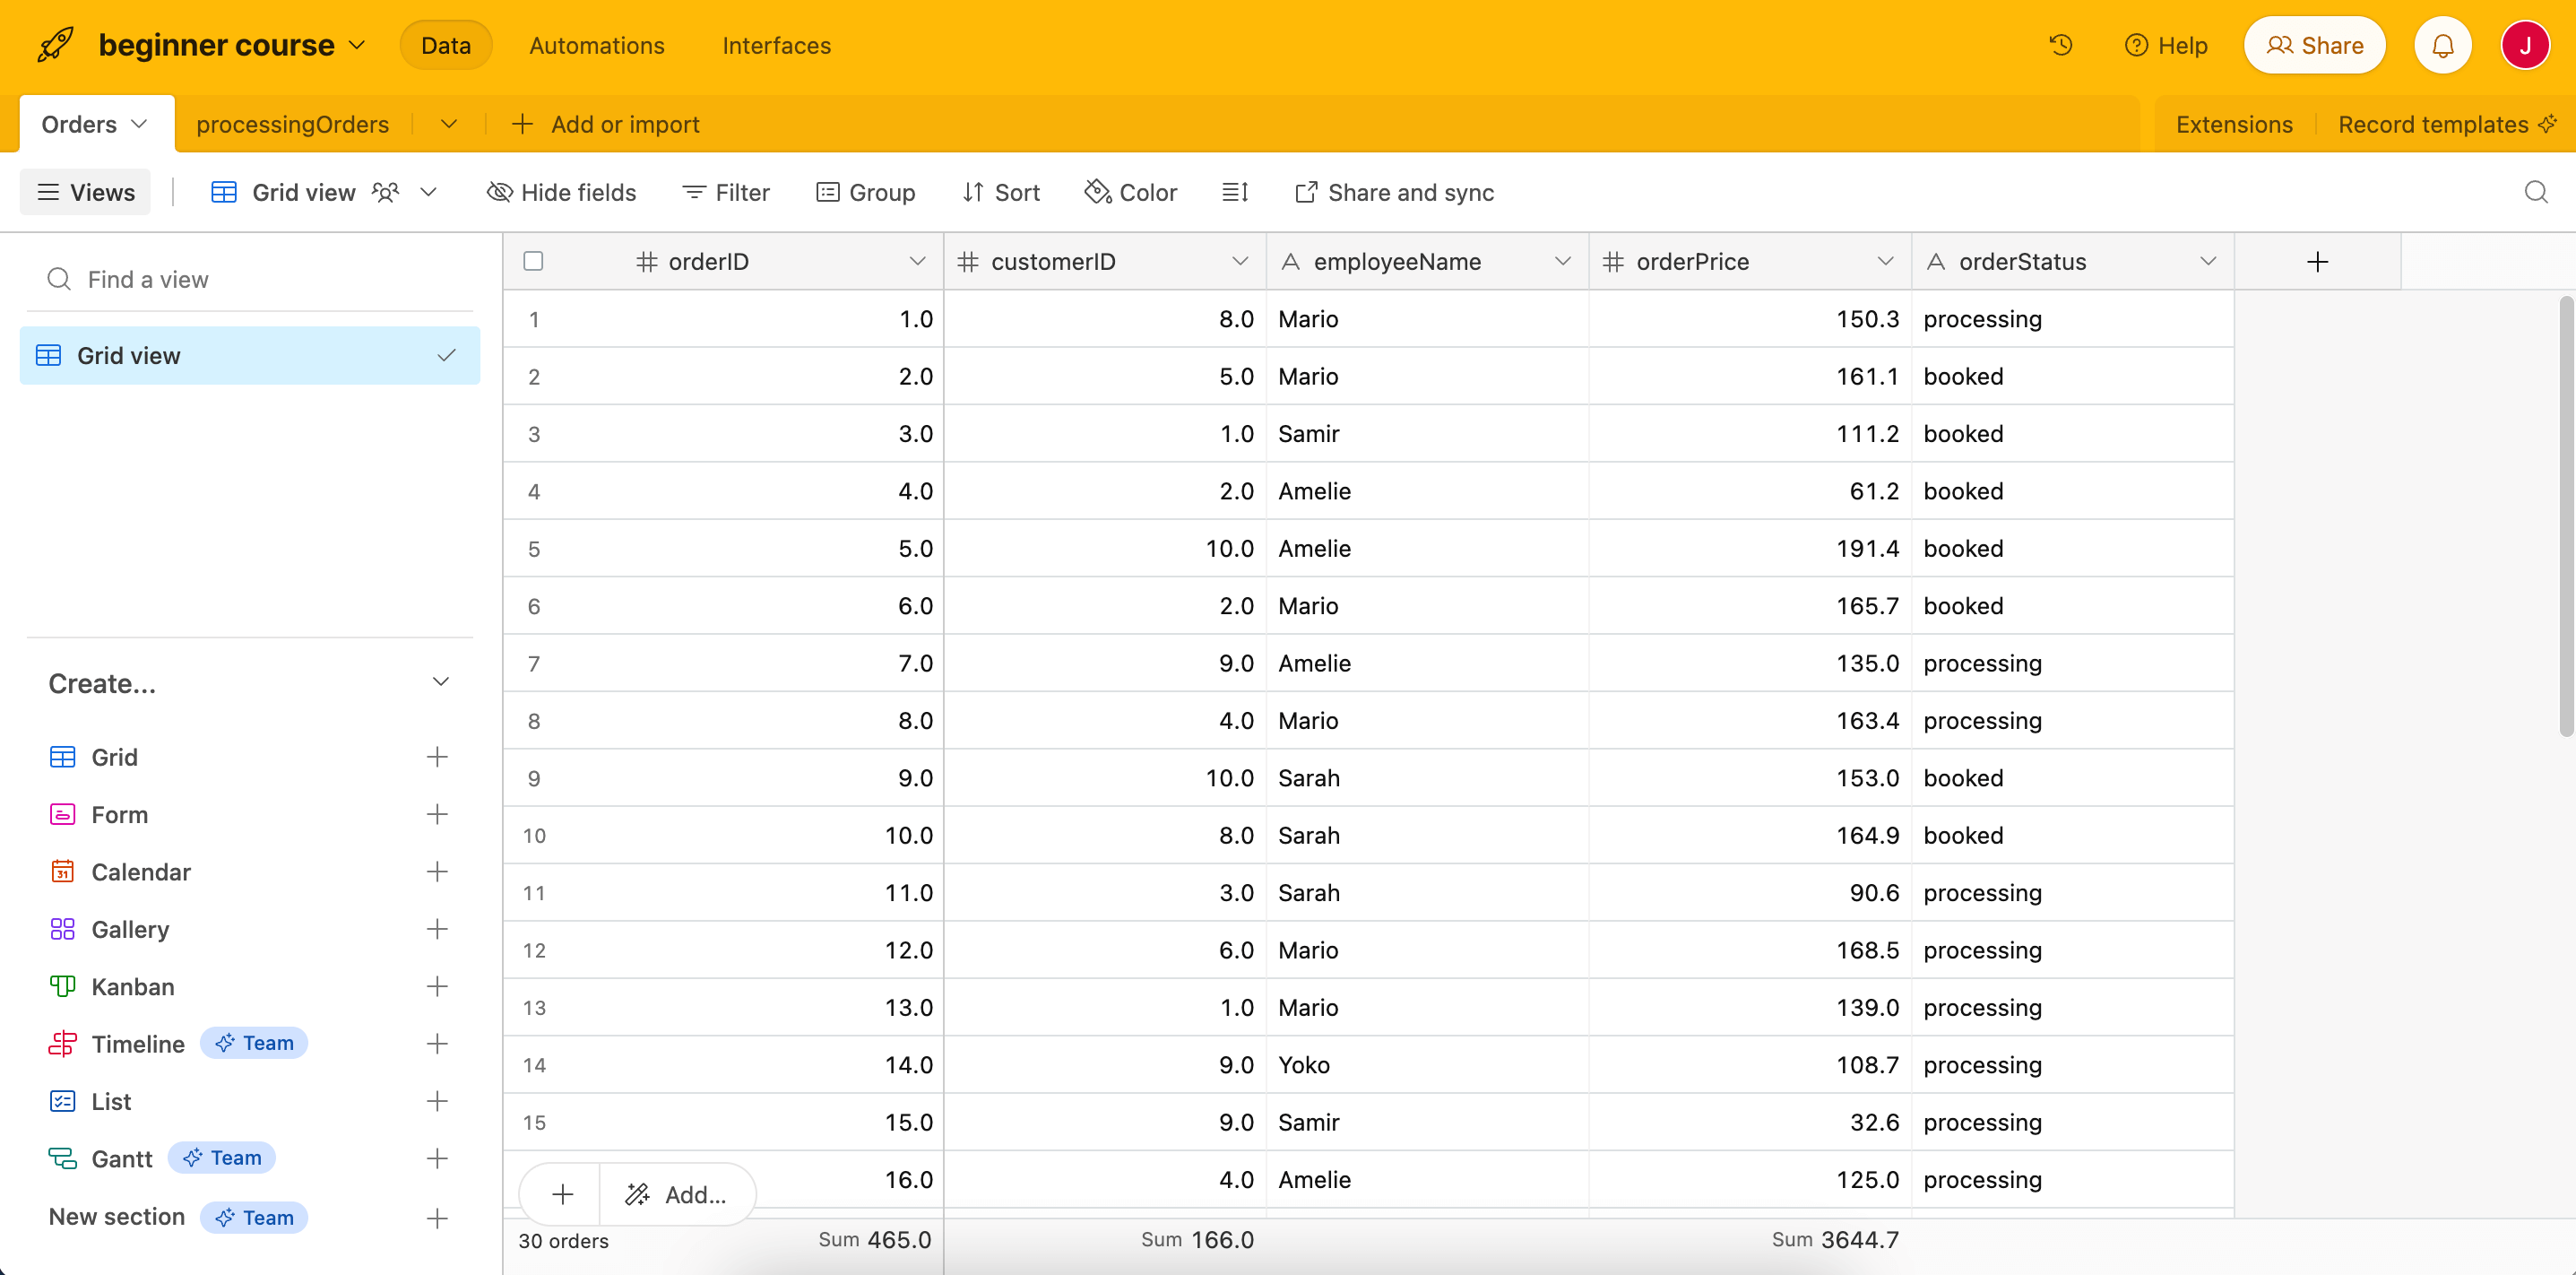
所有 30 条数据记录现在将显示在 Airtable 的订单表中:
¥All 30 data records will now appear in the orders table in Airtable:
下一步是什么?#
¥What's next?
Nathan 🙋:哇,这个自动化功能已经非常实用了!但这会将从 HTTP 请求节点收集的所有数据插入到 Airtable 中。还记得我实际上只需要在表中插入正在处理的订单并计算已预订订单的价格吗?
¥Nathan 🙋: Wow, this automation is already so useful! But this inserts all collected data from the HTTP Request node into Airtable. Remember that I actually need to insert only processing orders in the table and calculate the price of booked orders?
你 👩🔧:当然,没问题。下一步,我将使用一个新节点根据订单状态对其进行筛选。
¥You 👩🔧: Sure, no problem. As a next step, I'll use a new node to filter the orders based on their status.