4. 设置订单处理值#
¥ Setting Values for Processing Orders
在本工作流程步骤中,你将学习如何使用“编辑字段(设置)”节点在将数据传输到 Airtable 之前选择和设置数据。完成此步骤后,你的工作流应如下所示:
¥In this step of the workflow, you will learn how to select and set data before transferring it to Airtable using the Edit Fields (Set) node. After this step, your workflow should look like this:
Workflow preview placeholder.
Nathan 工作流程的下一步是筛选数据,仅将所有 processing 个订单中的 employeeName 和 orderID 插入到 Airtable 中。
¥The next step in Nathan's workflow is to filter the data to only insert the employeeName and orderID of all processing orders into Airtable.
为此,你需要使用 编辑字段(集)节点,它允许你选择和设置要从一个节点传输到另一个节点的数据。
¥For this, you need to use the Edit Fields (Set) node, which allows you to select and set the data you want to transfer from one node to another.
Edit Fields node
“编辑字段”节点可以设置全新的数据,也可以覆盖已存在的数据。此节点在需要从先前节点接收传入数据的工作流中至关重要,例如将值插入电子表格或数据库时。
¥The Edit Fields node can set completely new data as well as overwrite data that already exists. This node is crucial in workflows which expect incoming data from previous nodes, such as when inserting values into spreadsheets or databases.
在 Airtable 节点前添加另一个节点#
¥Add another node before the Airtable node
在你的工作流中,按照我们在 筛选订单 课程中对 If 节点的 true 连接器所做的操作,在 If 节点的 Airtable 节点之前添加另一个节点。如果画布显得拥挤,你可以随意将 Airtable 节点拖动到更远的位置。
¥In your workflow, add another node before the Airtable node from the If node in the same way we did it in the Filtering Orders lesson on the If node's true connector. Feel free to drag the Airtable node further away if your canvas feels crowded.
配置编辑字段节点#
¥Configure the Edit Fields node
在选中“如果”节点的 true 连接器上的“+”号后,搜索“编辑字段(设置)”节点。
¥Now search for the Edit Fields (Set) node after you've selected the + sign coming off the If node's true connector.
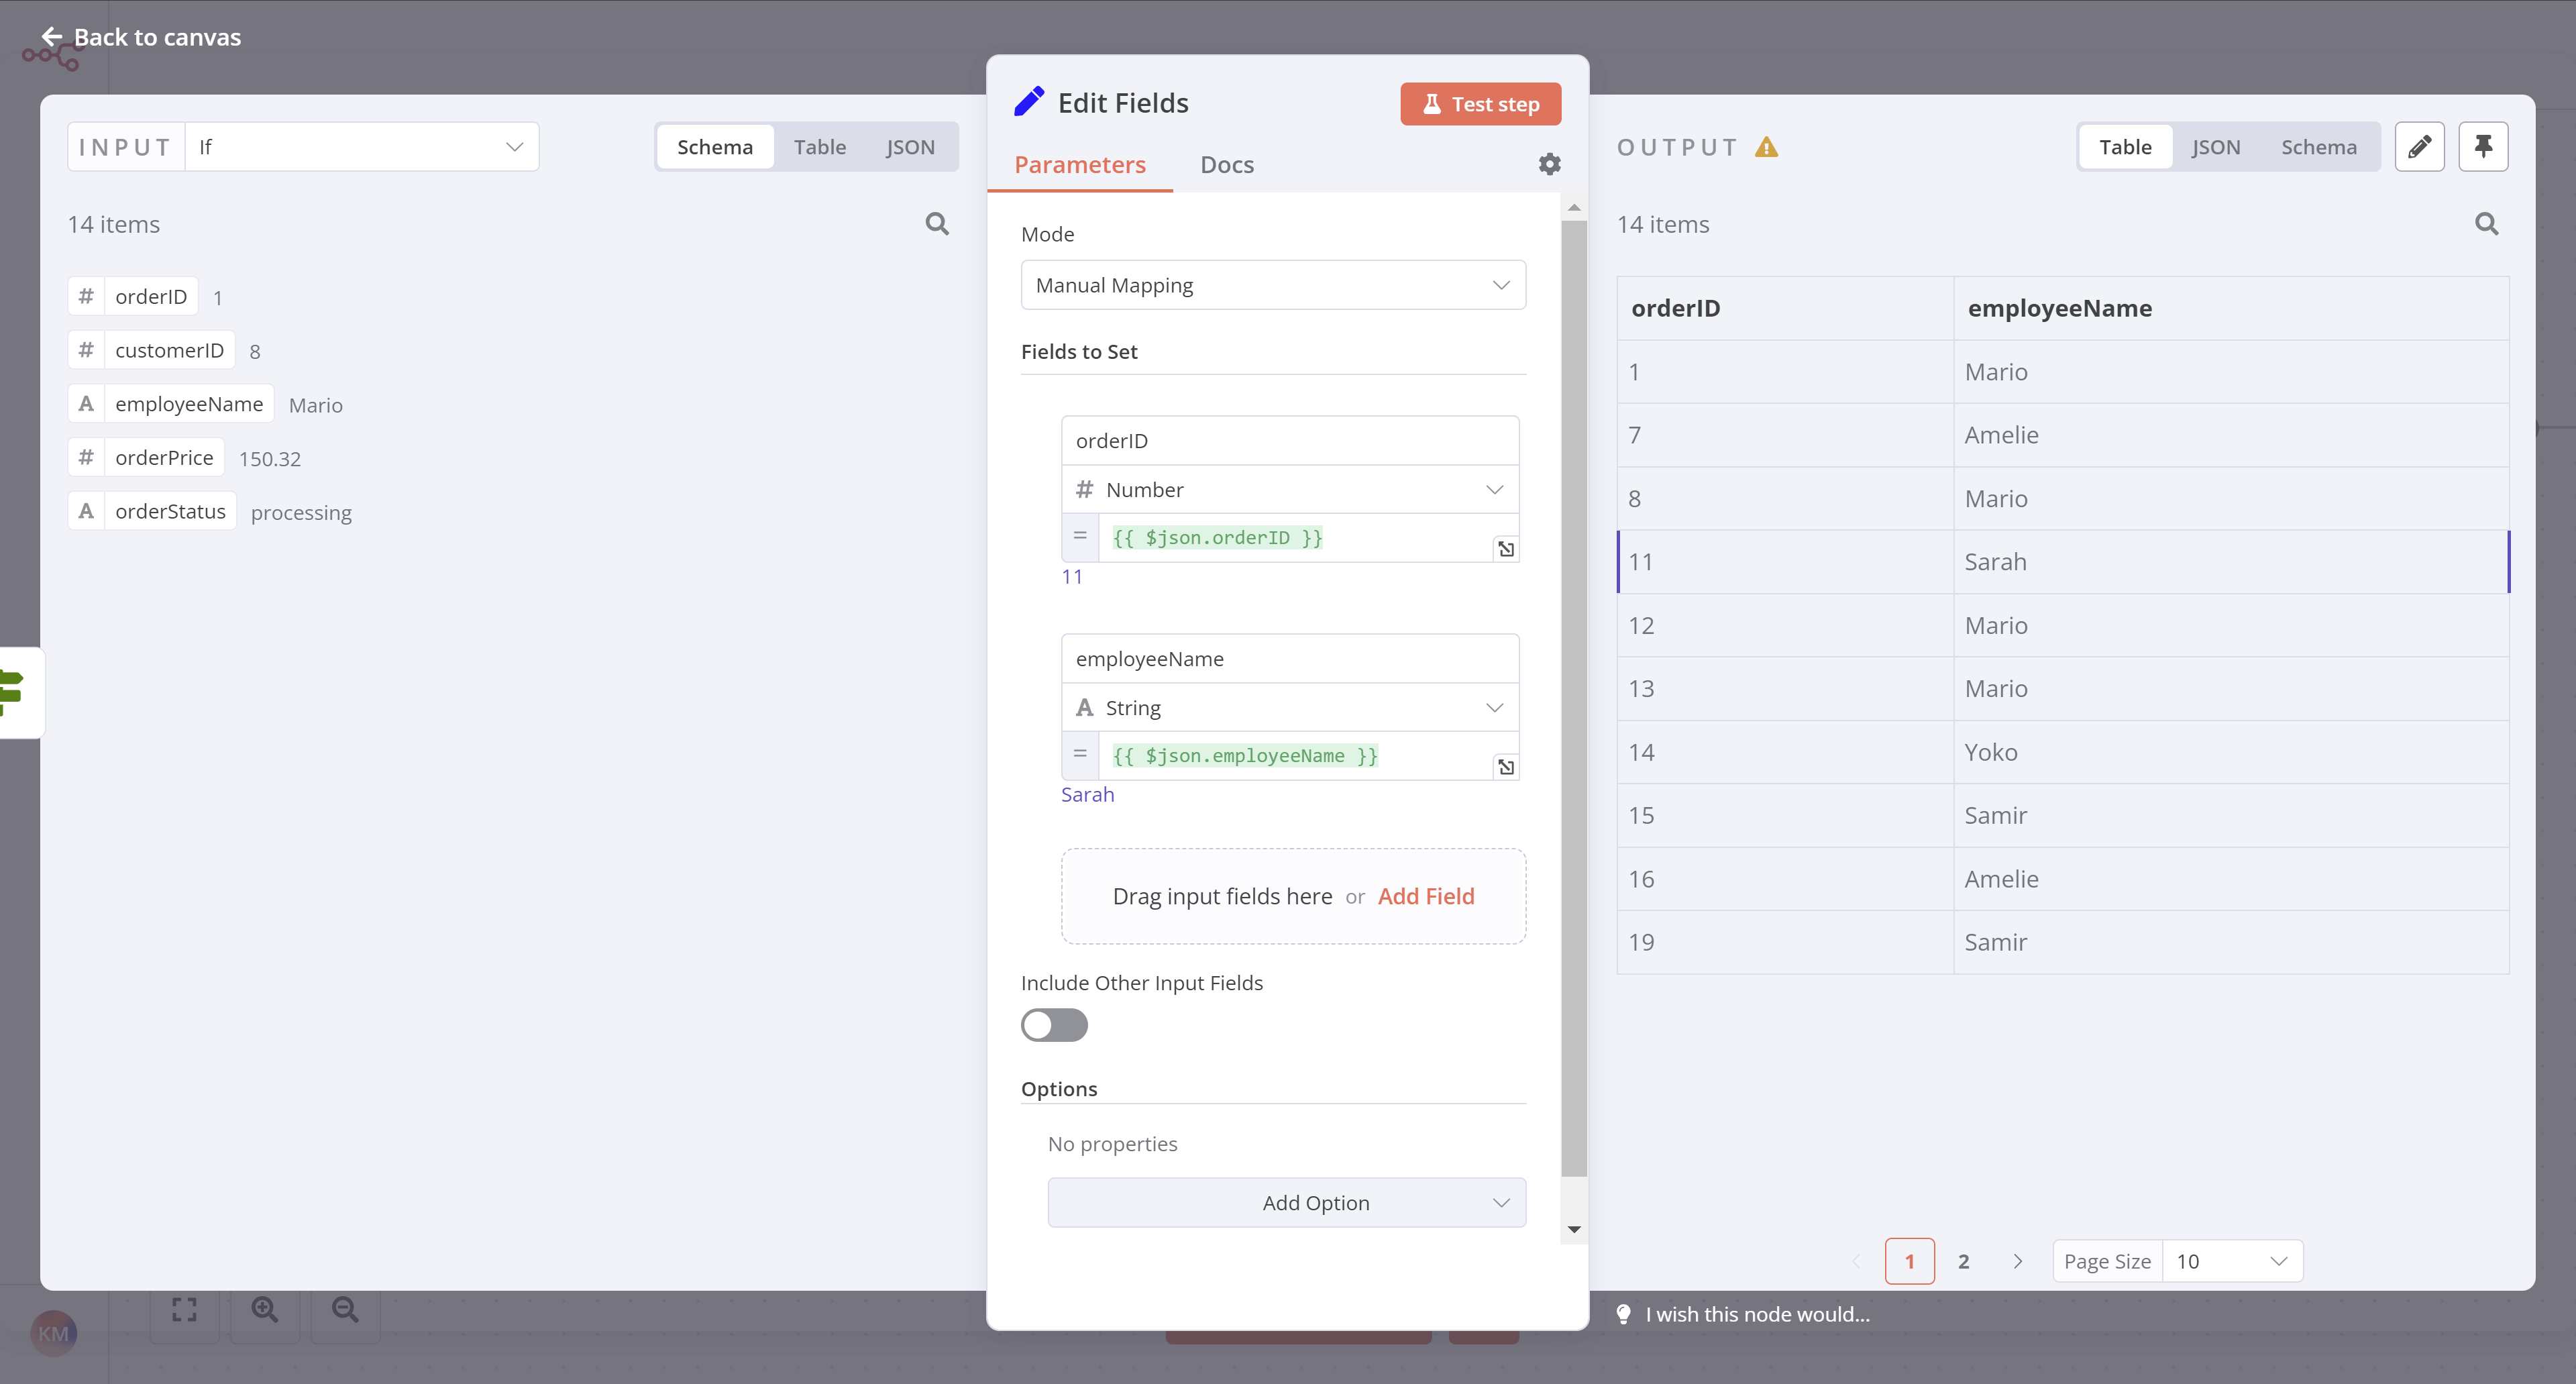
打开“编辑字段”节点窗口,配置以下参数:
¥With the Edit Fields node window open, configure these parameters:
- 确保“模式”设置为“手动映射”。
¥Ensure Mode is set to Manual Mapping.
- 虽然你可以使用我们在 筛选订单 课程中使用的表达式编辑器,但这次,让我们将字段从“输入”拖到“要设置的字段”中:
¥While you can use the Expression editor we used in the Filtering Orders lesson, this time, let's drag the fields from the Input into the Fields to Set:
-
将“如果 > orderID”拖到第一个字段。
¥Drag If > orderID as the first field.
-
将“如果 > employeeName”拖到第二个字段。
¥Drag If > employeeName as the second field.
-
确保“包含其他输入字段”设置为 false。
¥Ensure that Include Other Input Fields is set to false.
选择“执行步骤”。你应该看到以下结果:
¥Select Execute step. You should see the following results:
向 Airtable 添加数据#
¥Add data to Airtable
接下来,让我们将这些值插入到 Airtable:
¥Next, let's insert these values into Airtable:
- 前往你的 Airtable 数据库。
¥Go to your Airtable base.
2. 添加名为 processingOrders 的新表。
¥Add a new table called processingOrders.
3. 将现有列替换为两个新列:
¥Replace the existing columns with two new columns:
-
orderID(主字段):数字¥
orderID(primary field): Number -
employeeName:单行文本¥
employeeName: Single line text
Reminder
1 | |
- 删除新表中的三行空行。
¥Delete the three empty rows in the new table. 5. 在 n8n 中,将“编辑字段”节点连接器连接到 Airtable 节点。
¥In n8n, connect the Edit Fields node connector to the Airtable node**.
6. 更新 Airtable 节点配置,使其指向新的 processingOrders 表,而不是 orders 表。
¥Update the Airtable node configuration to point to the new processingOrders table instead of the orders table.
7. 测试你的 Airtable 节点,确保它能将记录插入到新的 processingOrders 表中。
¥Test your Airtable node to be sure it inserts records into the new processingOrders table.
此时,你的工作流程现在应如下所示:
¥At this stage, your workflow should now look like this:
Workflow preview placeholder.
下一步是什么?#
¥What's next?
Nathan 🙋:你已经自动化了我一半的工作!现在我还需要为我的同事计算已预订订单。我们也可以实现自动化吗?
¥Nathan 🙋: You've already automated half of my work! Now I still need to calculate the booked orders for my colleagues. Can we automate that as well?
你 👩🔧:是的!下一步,我将在一个节点中使用一些 JavaScript 代码来计算已预订的订单。
¥You 👩🔧: Yes! In the next step, I'll use some JavaScript code in a node to calculate the booked orders.