浏览编辑器界面#
在本课中,你将学习如何导航编辑器界面。我们将浏览画布,并向你展示每个图标的含义,以及在 n8n 中构建工作流时需要找到的内容所在位置。
🌐 In this lesson you will learn how to navigate the Editor UI. We will walk through the canvas and show you what each icon means and where to find things you will need while building workflows in n8n.
n8n 版本
本课程基于 n8n 1.82.1 版本。在其他版本中,某些用户界面可能有所不同,但这不应影响核心功能。
入门(Getting started)#
首先设置 n8n。
🌐 Begin by setting up n8n.
我们建议从 n8n Cloud 开始,这是一个无需安装的托管解决方案,并且提供免费试用。
🌐 We recommend starting with n8n Cloud, a hosted solution that doesn't require installation and includes a free trial.
备用设置
如果 n8n Cloud 不适合你,你可以使用 Docker 自行托管。这是一个高级选项,仅推荐给熟悉托管服务、Docker 和命令行的技术用户。
有关设置 n8n 的不同方式的更多详细信息,请参阅我们的 平台文档。
🌐 For more details on the different ways to set up n8n, see our platforms documentation.
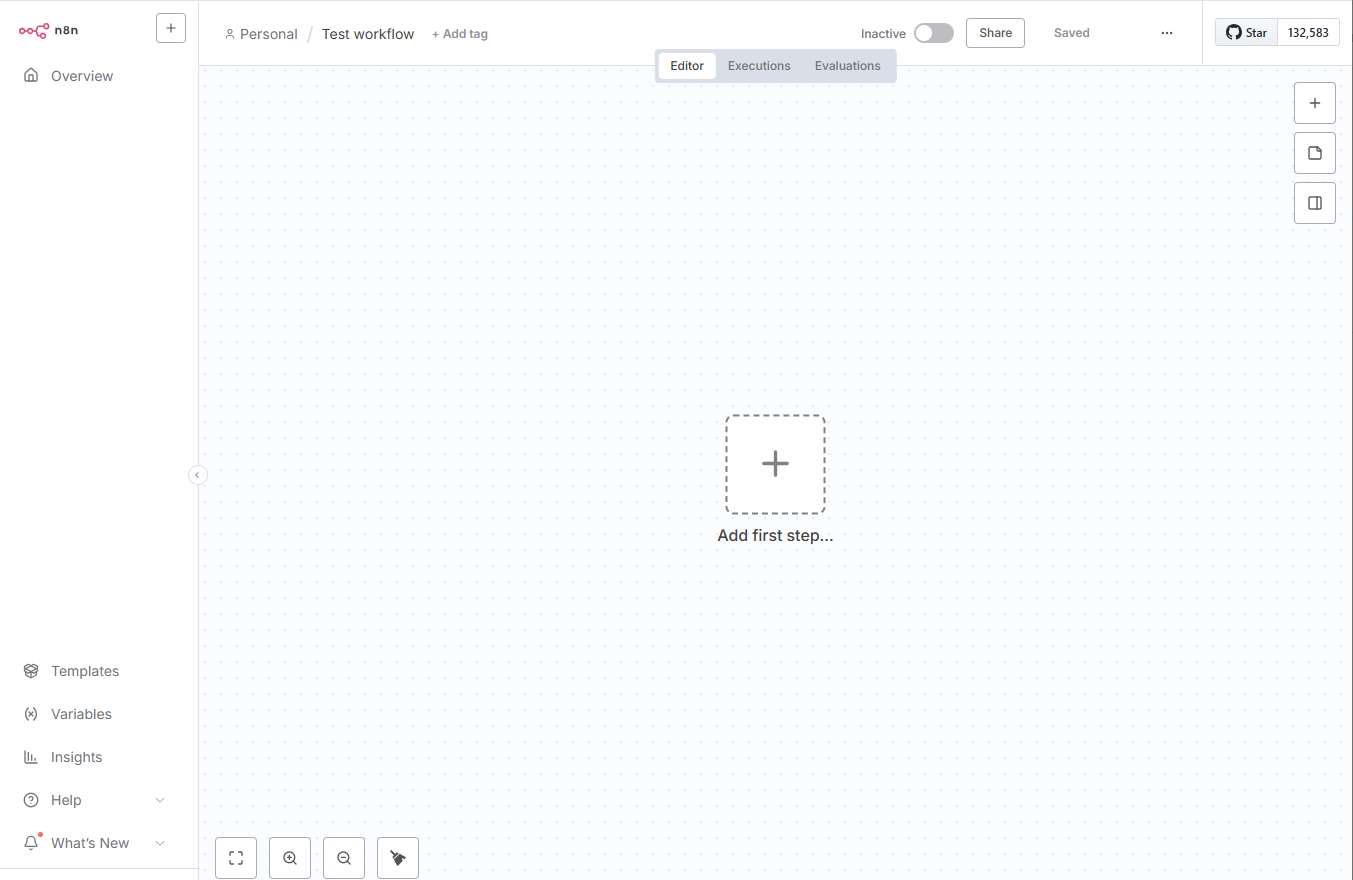
一旦 n8n 运行起来,在浏览器窗口中打开编辑器界面。登录到你的 n8n 实例。选择 概览,然后选择 创建工作流 来查看主画布。
🌐 Once you have n8n running, open the Editor UI in a browser window. Log in to your n8n instance. Select Overview and then Create Workflow to view the main canvas.
它应该看起来像这样:
🌐 It should look like this:
编辑器界面设置(Editor UI settings)#
编辑器用户界面是你构建工作流程的网页界面。你可以从编辑器用户界面访问你所有的工作流程和凭证,以及支持页面。
🌐 The editor UI is the web interface where you build workflows. You can access all your workflows and credentials, as well as support pages, from the Editor UI.
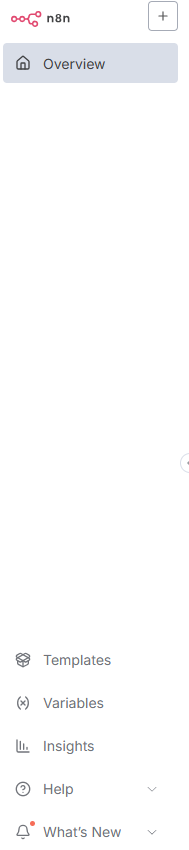
左侧面板(Left-side panel)#
编辑器界面的左侧有一个面板,其中包含管理工作流的核心功能和设置。可以通过点击小箭头图标来展开或折叠它。
🌐 On the left side of the Editor UI, there is a panel which contains the core functionalities and settings for managing your workflows. Expand and collapse it by selecting the small arrow icon.
面板包含以下部分:
🌐 The panel contains the following sections:
- 概览:包含你可以访问的所有工作流程、凭据和执行。在本课程中,请在此创建新的工作流程。
- 个人:每个用户都会获得一个默认的个人项目。如果你不创建自定义项目,你的工作流和凭证将存储在这里。
- 项目:项目让你可以将工作流和凭证组合在一起。你可以给项目中的用户分配角色以控制他们可以执行的操作。社区版不提供项目功能。
- 管理面板:仅限 n8n Cloud。访问你的 n8n 实例使用情况、账单和版本设置。
- 模板:一组预先制作的工作流程。是开始常见用例的绝佳起点。
- 变量:用于在工作流中存储和访问固定数据。此功能在专业版和企业版计划中可用。
- 洞察:提供关于你的工作流程的分析和见解。
- 帮助:包含有关 n8n 产品和社区的资源。
- 最新动态:展示最新的产品更新和功能。
顶部栏(Top bar)#
编辑器用户界面的顶部栏包含以下信息:
🌐 The top bar of the Editor UI contains the following information:
- 工作流名称:默认情况下,n8n 会将新工作流命名为“我的工作流”,但你可以随时编辑名称。
- + 添加标签:标签可以帮助你按类别、用途或其他相关方式组织工作流程。标签是可选的。
- 发布:此按钮用于发布当前工作流。默认情况下,工作流未发布。
- 共享:你可以在入门、专业和企业计划中与他人共享和协作工作流程。
- 保存:此按钮用于保存当前工作流程。
- 历史记录:一旦你保存了工作流程,就可以在这里查看之前的版本。

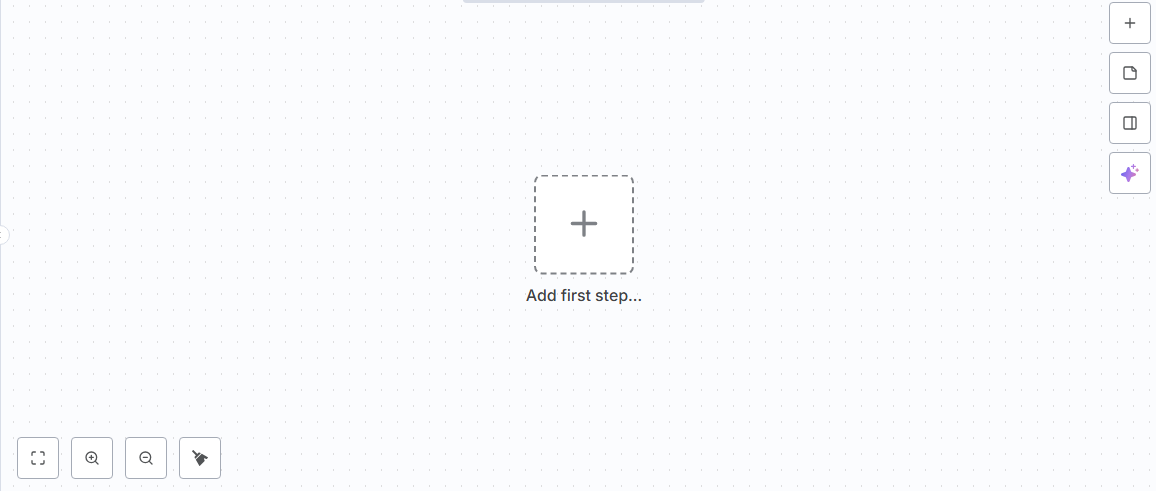
画布(Canvas)#
画布是编辑器界面中的灰色点状网格背景。它显示了几个图标和具有不同功能的节点:
🌐 The canvas is the gray dotted grid background in the Editor UI. It displays several icons and a node with different functionalities:
- 用于缩放画布以适应屏幕、放大或缩小画布、重置缩放以及整理屏幕上节点的按钮。
- 在添加第一个节点后,可以点击一个按钮来执行工作流。点击它时,n8n 会按顺序执行画布上的所有节点。
- 一个内部有 + 符号的按钮。此按钮用于打开节点面板。
- 一个带有便签图标的按钮。点击此按钮可以在画布上添加一个便签(当鼠标悬停在右上角的 + 图标时可见)。
- 画布右侧会显示一个标有 询问助手 的按钮。你可以向 AI 助手寻求构建工作流的帮助。
- 一个带有文字“添加第一步”的虚线方框。这是你添加第一个节点的地方。
移动画布
你可以用三种方式移动工作流画布:
- 在画布上按住 ++Ctrl+左键++ 并移动。
- 在画布上使用 ++中键++ 并移动。
- 在触控板上放置两个手指并滑动。
现在先不用担心工作流的执行和发布;我们会在课程后面解释这些概念。
🌐 Don't worry about workflow execution and publishing for now; we'll explain these concepts later on in the course.
节点(Nodes)#
你可以把节点看作是不同功能的构建模块,当它们组合在一起时,就形成了一个运作的机器:一个自动化的工作流程。
🌐 You can think of nodes as building blocks that serve different functions that, when put together, make up a functioning machine: an automated workflow.
节点
节点是工作流程中的一个独立步骤:它要么 (a) 加载数据,(b) 处理数据,或 (c) 发送数据。
n8n 根据节点的功能将其分为四种类型:
🌐 Based on their function, n8n classifies nodes into four types:
- 应用或动作节点可以添加、删除和编辑数据;请求和发送外部数据;并触发其他系统中的事件。有关这些节点的完整列表,请参阅 动作节点库。
- 触发节点 用于启动工作流并提供初始数据。请参考 触发节点库 查看触发节点列表。
- 核心节点 可以是触发节点或应用节点。大多数节点连接到特定的外部服务,而核心节点则提供逻辑、调度或通用 API 调用等功能。完整的核心节点列表请参阅 核心节点库。
- 集群节点 是协同工作的节点组,用于在工作流中提供功能,主要用于 AI 工作流。更多信息请参阅 集群节点。
了解更多
有关所有节点类型的更详细说明,请参阅 节点类型。
查找节点(Finding nodes)#
你可以在编辑器界面右侧的 节点面板 中找到所有可用的节点。打开节点面板有三种方法:
🌐 You can find all available nodes in the nodes panel on the right side of the Editor UI. There are three ways in which you can open the nodes panel:
- 点击画布右上角的 + 图标。
- 点击画布上现有节点右侧的 + 图标(即你想要添加另一个节点的节点)。
- 按下键盘上的 Tab 键。
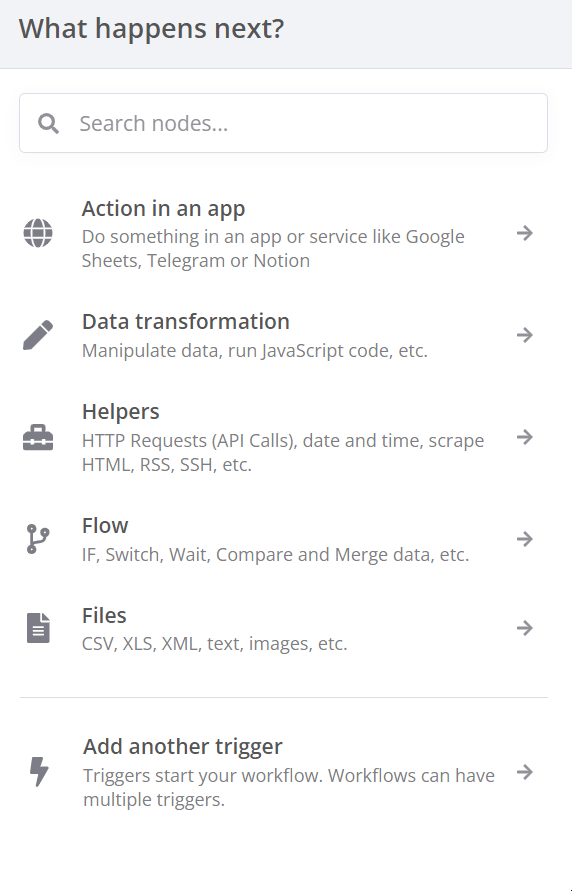
在节点面板中,请注意,当添加第一个节点时,你会看到不同的触发节点类别。添加触发节点后,你会看到节点面板发生变化,显示高级 AI、应用操作、数据转换、流程、核心和人工干预节点。
🌐 In the nodes panel, notice that when adding your first node, you will see the different trigger node categories. After you have added your trigger node, you'll see that the nodes panel changes to show Advanced AI, Actions in an App, Data transformation, Flow, Core, and Human in the loop nodes.
如果你想查找特定节点,请使用节点面板顶部的搜索框。
🌐 If you want to find a specific node, use the search input at the top of the nodes panel.
添加节点(Adding nodes)#
你可以通过两种方式向画布添加节点:
🌐 There are two ways to add nodes to your canvas:
- 在节点面板中选择你想要的节点。新节点将自动连接到画布上选中的节点。
- 将节点从节点面板拖放到画布上。
节点按钮(Node buttons)#
将鼠标悬停在节点上,你会注意到顶部出现三个图标:
🌐 If you hover on a node, you'll notice that three icons appear on top:
- 执行节点(播放图标)
- 停用/激活节点(电源图标)
- 删除节点(垃圾桶图标)。
还会有一个省略号图标,点击它会打开一个包含其他 节点选项 的上下文菜单。
🌐 There will also be an ellipsis icon, which opens a context menu containing other node options.
移动工作流程
要在画布上移动工作流程,请使用鼠标选择所有节点或按 Ctrl+A,然后选中并按住一个节点,将其拖动到画布上的任意位置。
摘要(Summary)#
在本课中,你学习了如何浏览编辑器 UI、图标的含义、如何访问左侧面板和节点面板,以及如何向画布添加节点。
🌐 In this lesson you learned how to navigate the Editor UI, what the icons mean, how to access the left-side and node panels, and how to add nodes to the canvas.
在下一课中,你将构建一个小型工作流,将目前所学的知识付诸实践。
🌐 In the next lesson, you will build a mini-workflow to put into practice what you've learned so far.