使用 n8n 构建 AI 聊天代理(Build an AI chat agent with n8n)#
欢迎来到 n8n 构建 AI 工作流程的入门教程。无论你以前是否使用过 n8n,还是第一次使用,我们将向你展示 AI 工作流程的构建块如何组合在一起,并构建一个可工作的 AI 驱动聊天代理,你可以轻松地根据自己的需求进行自定义。
🌐 Welcome to the introductory tutorial for building AI workflows with n8n. Whether you have used n8n before, or this is your first time, we will show you how the building blocks of AI workflows fit together and construct a working AI-powered chat agent which you can easily customize for your own purposes.
许多人发现以视频形式获取新信息更容易。本教程基于 n8n 的一段热门视频,链接如下。你可以观看视频,也可以在这里阅读步骤,或者两者都做!
🌐 Many people find it easier to take in new information in video format. This tutorial is based on one of n8n's popular videos, linked below. Watch the video or read the steps here, or both!
你需要准备什么?(What you will need)#
- n8n:对于本教程,我们推荐使用n8n 云服务——新用户可以享受免费试用!如果想使用自托管服务,请参考安装页面。
- 聊天模型的凭证:本教程使用 OpenAI,但你也可以轻松使用 DeepSeek、Google Gemini、Groq、Azure 等(更多信息请参见 子节点文档)。
你将学习什么?(What you will learn)#
- n8n 中的 AI 概念
- 如何使用 AI Agent 节点
- 使用聊天输入
- 正在连接 AI 模型
- 自定义输入
- 观察会话
- 添加持久性
n8n 中的 AI 概念(AI concepts in n8n)#
如果你已经熟悉人工智能,可以跳过本节。这是对人工智能概念以及它们如何在 n8n 工作流程中使用的基本介绍。
🌐 If you're already familiar with AI, feel free to skip this section. This is a basic introduction to AI concepts and how they can be used in n8n workflows.
一个人工智能代理基于大语言模型(LLMs)构建,这些模型通过预测下一个词来根据输入生成文本。虽然LLMs只处理输入以产生输出,但人工智能代理增加了以目标为导向的功能。它们可以使用工具、处理工具输出,并作出决策以完成任务和解决问题。
🌐 An AI agent builds on Large Language Models (LLMs), which generate text based on input by predicting the next word. While LLMs only process input to produce output, AI agents add goal-oriented functionality. They can use tools, process their outputs, and make decisions to complete tasks and solve problems.
在 n8n 中,AI 代理以节点的形式表示,并带有一些额外的连接。
🌐 In n8n, the AI agent is represented as a node with some extra connections.
| 特性 | 大语言模型(LLM) | 人工智能代理(AI Agent) |
|---|---|---|
| 核心能力 | 文本生成 | 面向目标的任务完成 |
| 决策能力 | 无 | 有 |
| 使用工具/接口 | 否 | 是 |
| 工作流程复杂度 | 单步 | 多步 |
| 适用范围 | 生成语言 | 执行复杂的现实任务 |
| 示例 | LLM生成一段文字 | 代理安排一次预约 |
通过将 AI 代理作为一个节点整合,n8n 可以将 AI 驱动的步骤与传统编程结合起来,从而实现高效的实际工作流程。例如,较简单的任务,如验证邮箱地址,并不需要 AI,而复杂的任务,如处理电子邮件的内容或处理多模态输入(例如图片、音频),则是 AI 代理的理想应用场景。
🌐 By incorporating the AI agent as a node, n8n can combine AI-driven steps with traditional programming for efficient, real-world workflows. For instance, simpler tasks, like validating an email address, do not require AI, whereas a complex tasks, like processing the content of an email or dealing with multimodal inputs (e.g., images, audio), are excellent uses of an AI agent.
1. 创建一个新工作流程(1. Create a new workflow)#
When you open n8n, you'll see either:
- An empty workflow: if you have no workflows and you're logging in for the first time. Use this workflow.
- The Workflows list on the Overview page. Select the
 button to create a new workflow.
2. 添加一个触发节点(2. Add a trigger node)#
每个工作流都需要一个起点。在 n8n 中,这些被称为'触发节点'。对于这个工作流,我们希望从一个聊天节点开始。
🌐 Every workflow needs somewhere to start. In n8n these are called 'trigger nodes'. For this workflow, we want to start with a chat node.
- 选择 添加第一步 或按 Tab 打开节点菜单。
- 搜索 Chat Trigger。n8n 会显示与搜索匹配的节点列表。
- 选择 Chat Trigger 将节点添加到画布。n8n 会打开该节点。
- 关闭节点详情视图(选择 返回画布)以返回画布。
??? 解释 “关于聊天触发器节点的更多信息…" 触发器节点在有事件引发时会产生输出。在这种情况下,我们希望能够通过输入文本来触发工作流运行。在生产环境中,该触发器可以连接到 n8n 提供的公共聊天界面,或嵌入到其他网站中。为了启动这个简单工作流,我们只需使用内置的本地聊天界面进行通信,因此不需要进一步设置。
Workflow preview placeholder.
3. 添加一个 AI 代理节点(3. Add an AI Agent Node)#
AI 代理节点是向工作流程中添加 AI 的核心。
🌐 The AI Agent node is the core of adding AI to your workflows.
- 在触发器节点上选择 添加节点
 连接器以调出节点搜索。
 - 开始输入“AI”,然后选择 AI 代理 节点将其添加。
- AI 代理的编辑视图现在将显示。
- 有一些字段是可以更改的。由于我们使用的是 聊天触发器 节点,因此提示的来源和规范的默认设置无需更改。
Workflow preview placeholder.
4. 配置节点(4. Configure the node)#
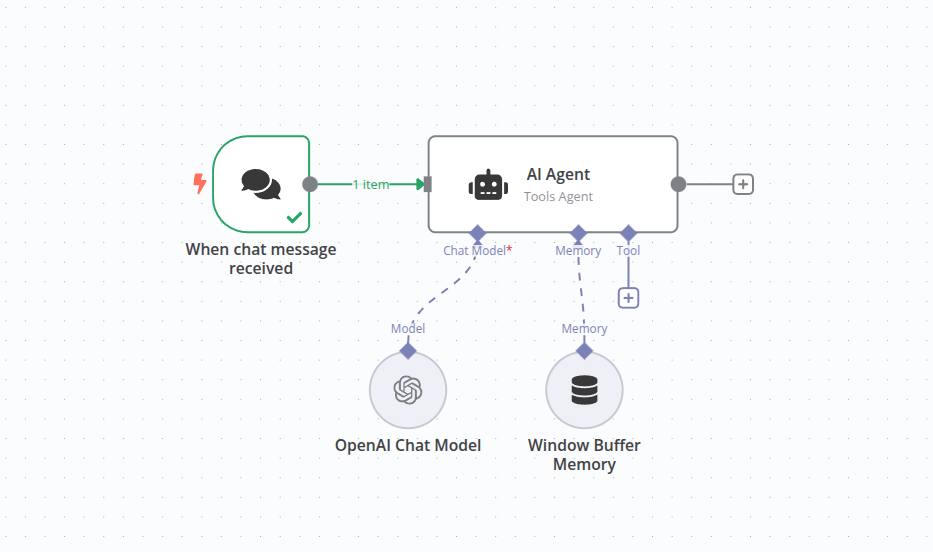
AI 代理需要附加聊天模型来处理传入的提示。
🌐 AI agents require a chat model to be attached to process the incoming prompts.
- 通过点击 AI Agent 节点上 Chat Model 连接下方的加号 按钮添加聊天模型(它是节点底部的第一个连接)。
- 搜索对话框将出现,并筛选为“语言模型”。这些是 n8n 内置支持的模型。在本教程中,我们将使用 OpenAI 聊天模型。
- 从列表中选择OpenAI 聊天模型将把它附加到AI 代理节点并打开节点编辑器。其中一个可以更改的参数是“模型”。请注意,对于基本的 OpenAI 账户,仅允许使用“gpt-4o-mini”模型。
??? 解释 “哪种聊天模型?” 正如前面提到的,LLM(大型语言模型)是根据给定的提示生成文本的组件。LLM 需要被创建和训练,这通常是一个密集的过程。不同的 LLM 可能具有不同的能力或专长,这取决于它们训练所使用的数据。
5. 添加凭证(如需要)(5. Add credentials (if needed))#
为了使 n8n 能够与聊天模型进行通信,它需要一些凭证(登录数据,使其能够访问其他在线服务的账户)。如果你已经为 OpenAI 设置了凭证,这些凭证默认应该会出现在凭证选择器中。否则,你可以使用凭证选择器来帮助添加新的凭证。
🌐 In order for n8n to communicate with the chat model, it will need some credentials (login data giving it access to an account on a different online service). If you already have credentials set up for OpenAI, these should appear by default in the credentials selector. Otherwise you can use the Credentials selector to help you add a new credential.
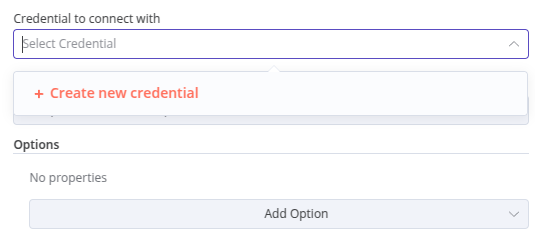
- 要添加新的凭据,请点击显示“选择凭据”的文字。添加新凭据的选项将会出现
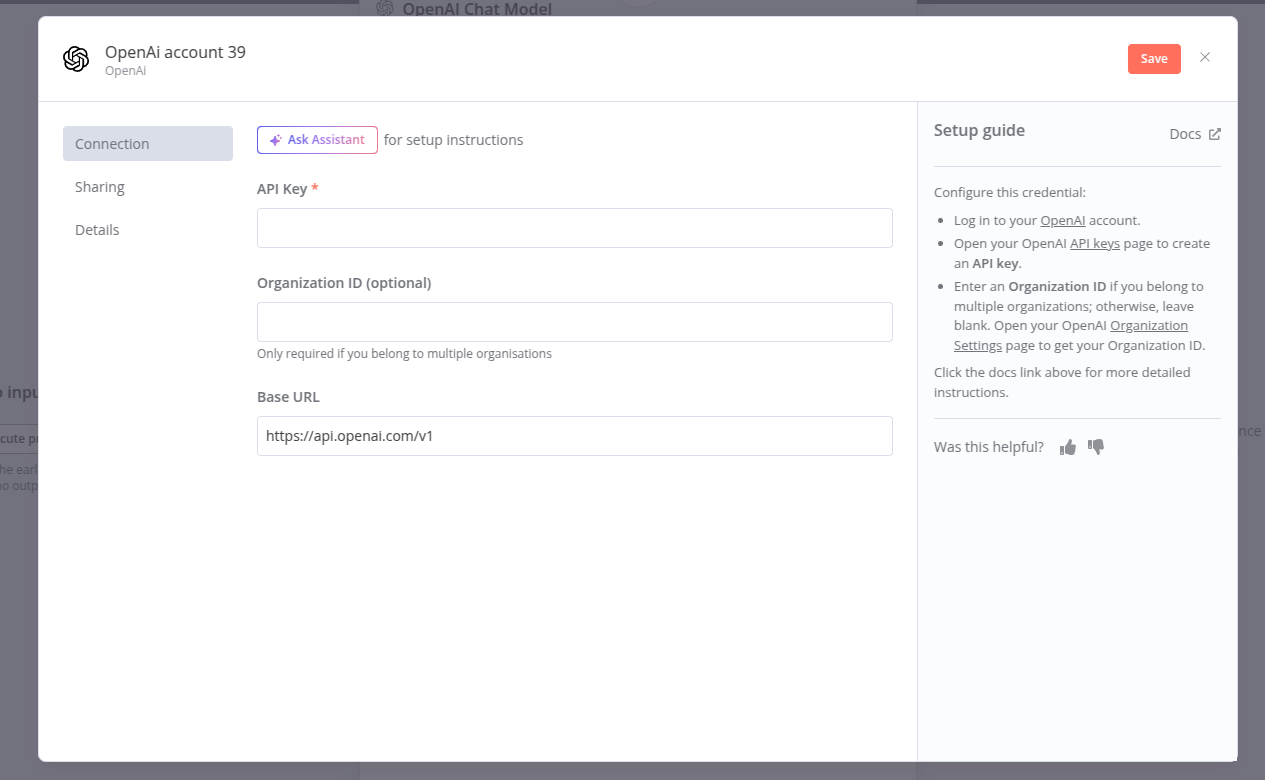
- 这个凭证只需要一个 API 密钥。添加任何类型的凭证时,请查看右侧的文本。在这种情况下,它提供了一个方便的链接,可以直接带你到 OpenAI 账户获取 API 密钥。
- API 密钥只是一个很长的字符串。这就是你这个凭证所需要的全部内容。从 OpenAI 网站复制它,然后粘贴到 API 密钥 部分即可。
“保持你的凭证安全”说明 凭证是由应用和服务发放的私有信息,用于验证你的用户身份,并允许你在应用或服务与 n8n 节点之间连接和共享信息。所需的信息类型取决于相关的应用/服务。你应小心不要在 n8n 之外共享或泄露这些凭证。
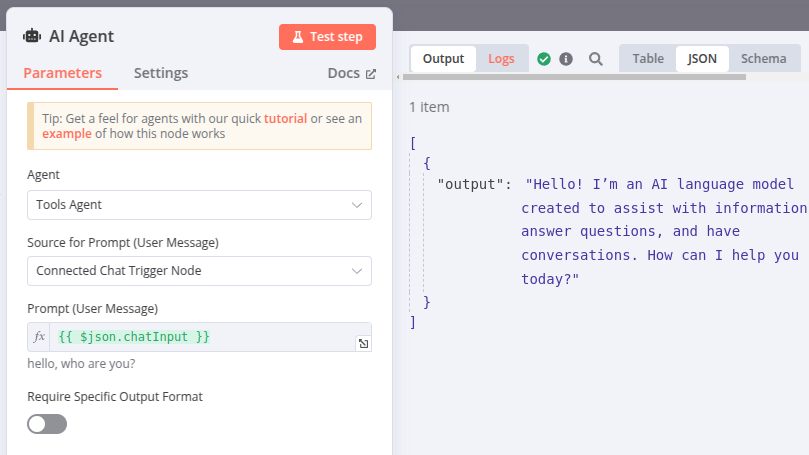
6. 测试节点(6. Test the node)#
现在节点已经连接到 聊天触发器 和聊天模型,我们可以测试工作流程的这一部分。
🌐 Now that the node is connected to the Chat Trigger and a chat model, we can test this part of the workflow.
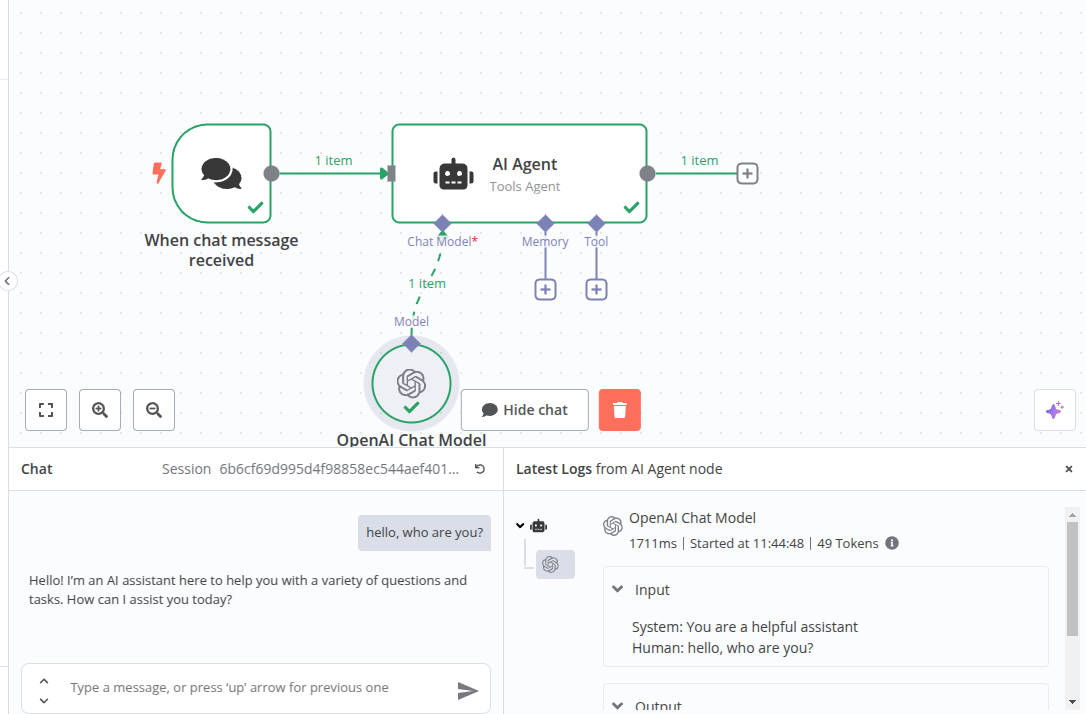
- 点击画布底部附近的“聊天”按钮。这会在左侧打开本地聊天窗口,在右侧显示 AI 代理登录信息。
- 输入消息然后按++回车++。你现在将在你的消息下方看到聊天模型的回应。
- 日志窗口显示 AI 代理的输入和输出。
??? 说明 “访问日志…"
即使不使用聊天界面,你也可以访问 AI 节点的日志。打开 AI Agent 节点,然后点击右侧面板中的 Logs 标签。
7. 修改提示(7. Changing the prompt)#
上一步的日志显示了一些额外的数据——系统提示。这是 AI 代理 用来预设聊天模型的默认消息。从日志中可以看到,这一提示被设置为“你是一个乐于助人的助手”。然而,我们可以更改这个提示来改变聊天模型的行为。
🌐 The logs in the previous step reveal some extra data - the system prompt. This is the default message that the AI Agent primes the chat model with. From the log you can see this is set to "You are a helpful assistant". We can however change this prompt to alter the behavior of the chat model.
- 打开 AI Agent 节点。在面板底部有一个标记为“选项”的部分和一个标记为“添加选项”的选择器。使用它来选择“系统消息”
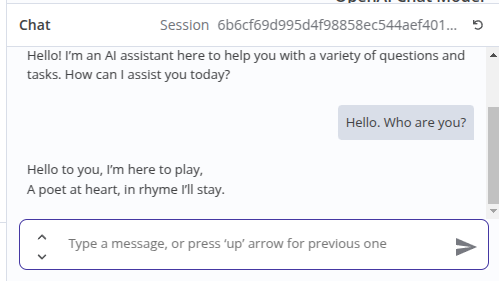
- 系统消息现在已显示。这就是我们之前在日志中注意到的相同启动提示。将提示更改为其他内容,以用不同的方式引导聊天模型。例如,你可以尝试像“你是一位出色的诗人,总是用押韵的对句回复”这样的提示。
- 关闭节点并返回聊天窗口。重复你的消息,并注意输出是如何变化的。
8. 增加持久性(8. Adding persistence)#
聊天模型现在可以提供有用的输出,但存在一些问题,当你尝试进行对话时就会发现。
🌐 The chat model is now giving us useful output, but there is something wrong with it which will become apparent when you try to have a conversation.
- 使用聊天功能并告诉聊天模型你的名字,例如“你好,我叫尼克”。
- 等待回应,然后输入消息“我叫什么名字?”。无论 AI 多么看起来抱歉,它都无法告诉你。原因是我们没有保存上下文。AI 代理没有记忆。

- 为了记住对话中发生的事情,AI 代理需要保留上下文。我们可以通过在 AI 代理 节点添加记忆来实现。在画布上点击 AI 代理 节点底部标有“Memory”的 。
- 从出现的面板中选择“简单记忆”。这将使用运行 n8n 的实例的内存,通常对于简单使用来说已经足够。默认的 5 次交互值在这里应该是足够的,但请记住这个选项的位置,以防你之后想要更改它。
- 重复上述对话练习,看看 AI 代理现在是否记住了你的名字。
9. 保存工作流程(9. Saving the workflow)#
离开工作流编辑器前,请务必保存工作流,否则所有更改都将丢失。
🌐 Before we leave the workflow editor, remember to save the workflow or all your changes will be lost.
- 点击编辑器窗口右上角的“保存”按钮。你的工作流程现在已保存,你可以稍后返回继续聊天或添加新功能。
恭喜!(Congratulations!)#
你已经迈出了使用 AI 构建有用且高效工作流程的第一步。在本教程中,我们探讨了 AI 工作流的基本构建模块,添加了AI 代理和聊天模型,并调整了提示以获得我们想要的输出。我们还添加了记忆功能,使聊天能够在消息之间保留上下文。
🌐 You have taken your first steps in building useful and effective workflows with AI. In this tutorial we have investigated the basic building blocks of an AI workflow, added an AI Agent and a chat model, and adjusted the prompt to get the kind of output we wanted. We also added memory so the chat could retain context between messages.
Workflow preview placeholder.
下一步步骤(Next steps)#
现在你已经了解了如何创建基本的 AI 工作流,你可以利用丰富的资源来拓展这些知识,并参考大量示例来了解下一步的方向:
🌐 Now you have seen how to create a basic AI workflow, there are plenty of resources to build on that knowledge and plenty of examples to give you ideas of where to go next:
- 了解有关人工智能概念的更多信息,并在示例与概念中查看示例。
- 浏览 AI 工作流程模板。
- 了解如何使用工具增强 AI 代理。