教程:创建带有源代码控制的环境(Tutorial: Create environments with source control)#
Feature availability
- Available on Enterprise.
- You must be an n8n instance owner or instance admin to enable and configure source control.
- Instance owners and instance admins can push changes to and pull changes from the connected repository.
- Project admins can push changes to the connected repository. They can't pull changes from the repository.
本教程将引导你完成从头到尾的环境搭建过程。你将创建两个环境:开发环境和生产环境。它使用 GitHub 作为 Git 提供商。对于其他提供商,流程类似。
🌐 This tutorial walks through the process of setting up environments end-to-end. You'll create two environments: development and production. It uses GitHub as the Git provider. The process is similar for other providers.
n8n 已经在 Git(版本控制软件)之上构建了其环境功能。你可以将 n8n 实例链接到 Git 分支,并使用推送-拉取模式在不同环境之间移动工作。你应该对环境和 Git 有一定了解。如果你需要更多相关信息,请参考:
🌐 n8n has built its environments feature on top of Git, a version control software. You link an n8n instance to a Git branch, and use a push-pull pattern to move work between environments. You should have some understanding of environments and Git. If you need more information on these topics, refer to:
选择你的源代码控制模式(Choose your source control pattern)#
在设置源代码管理和环境之前,你需要规划你的环境,以及它们与 Git 分支的关系。n8n 支持不同的分支模式。对于环境,你需要在两种模式之间进行选择:多实例多分支,或多实例单分支。本教程涵盖两种模式。
🌐 Before setting up source control and environments, you need to plan your environments, and how they relate to Git branches. n8n supports different Branch patterns. For environments, you need to choose between two patterns: multi-instance, multi-branch, or multi-instance, single-branch. This tutorial covers both patterns.
Recommendation: don't push and pull to the same n8n instance
You can push work from an instance to a branch, and pull to the same instance. n8n doesn't recommend this. To reduce the risk of merge conflicts and overwriting work, try to create a process where work goes in one direction: either to Git, or from Git, but not both.
多个实例,多个分支(Multiple instances, multiple branches)#
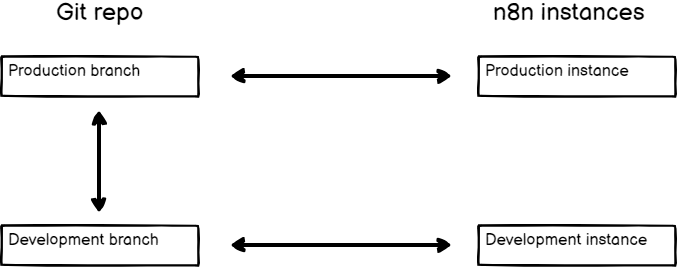
The advantages of this pattern are:
- An added safety layer to prevent changes getting into your production environment by mistake. You have to do a pull request in GitHub to copy work between environments.
- It supports more than two instances.
The disadvantage is more manual steps to copy work between environments.
多个实例,一个分支(Multiple instances, one branch)#
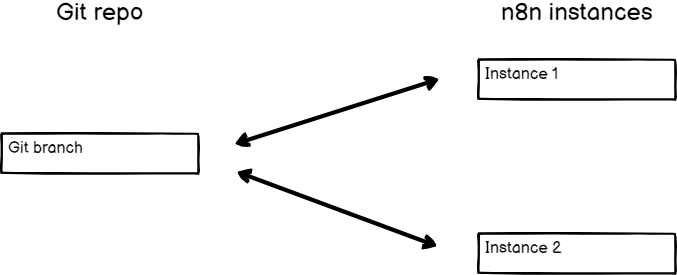
The advantage of this pattern is that work is instantly available to other environments when you push from one instance.
The disadvantages are:
- If you push by mistake, there is a risk the work will make it into your production instance. If you use a GitHub Action to automate pulls to production, you must either use the multi-instance, multi-branch pattern, or be careful to never push work that you don't want in production.
- Pushing and pulling to the same instance can cause data loss as changes are overridden when performing these actions. You should set up processes to ensure content flows in one direction.
设置代码仓库(Set up your repository)#
选择模式后,你需要设置 GitHub 代码库。
🌐 Once you've chosen your pattern, you need to set up your GitHub repository.
=== “多分支”
1 2 3 4 | |
=== “单分支”
1 2 3 4 | |
将你的 n8n 实例连接到你的存储库(Connect your n8n instances to your repository)#
创建两个 n8n 实例,一个用于开发,一个用于生产。
🌐 Create two n8n instances, one for development, one for production.
在 n8n 中配置 Git(Configure Git in n8n)#
- Go to Settings > Environments.
- Choose your connection method:
- SSH: In Git repository URL, enter the SSH URL for your repository (for example,
git@github.com:username/repo.git). - HTTPS: In Git repository URL enter the HTTPS URL for your repository (for example,
https://github.com/username/repo.git).
- SSH: In Git repository URL, enter the SSH URL for your repository (for example,
- Configure authentication based on your connection method:
- For SSH: n8n supports ED25519 and RSA public key algorithms. ED25519 is the default. Select RSA under SSH Key if your git host requires RSA. Copy the SSH key.
- For HTTPS: Enter your credentials:
- Username: Your Git provider username.
- Token: Your Personal Access Token (PAT) from your Git provider.
设置部署密钥(Set up a deploy key)#
通过使用 n8n 的 SSH 密钥为仓库创建部署密钥来设置 SSH 访问权限。该密钥必须具有写入权限。有关指导,请参阅 GitHub | 管理部署密钥。
🌐 Set up SSH access by creating a deploy key for the repository using the SSH key from n8n. The key must have write access. Refer to GitHub | Managing deploy keys for guidance.
连接 n8n 并配置你的实例(Connect n8n and configure your instance)#
=== “多分支”
1 2 3 4 | |
=== “单分支”
1 2 3 4 | |
从开发环境推送工作(Push work from development)#
在你的开发实例中,创建一些工作流、标签、变量和凭据。
🌐 In your development instance, create a few workflows, tags, variables, and credentials.
To push work to Git:
-
Select Push
 in the main menu.
View screenshot
Pull and push buttons when menu is closed 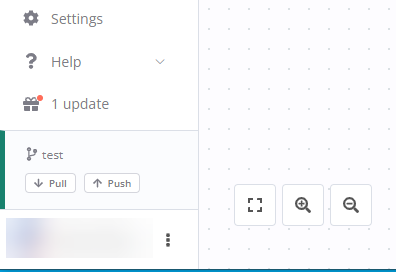
Pull and push buttons when menu is open -
In the Commit and push changes modal, select which workflows you want to push. You can filter by status (new, modified, deleted) and search for workflows. n8n automatically pushes tags, and variable and credential stubs.
n8n pushes the current saved version, not the published version, of the workflow. You need to then separately publish versions on the remote server.
- Enter a commit message. This should be a one sentence description of the changes you're making.
- Select Commit and Push. n8n sends the work to Git, and displays a success message on completion.
将工作拉取到生产环境(Pull work to production)#
你的工作现在已经在 GitHub 上。如果你使用的是多分支设置,则在开发分支上。如果你选择的是单分支设置,则在主分支上。
🌐 Your work is now in GitHub. If you're using a multi-branch setup, it's on the development branch. If you chose the single-branch setup, it's on main.
=== “多分支”
1 2 3 | |
=== “单分支”
1 | |
View screenshot
可选:使用 GitHub Action 自动拉取(Optional: Use a GitHub Action to automate pulls)#
如果你想避免登录到生产实例进行拉取,你可以使用 GitHub Action 和 n8n API,在每次向生产分支或主分支推送新工作时自动拉取。
🌐 If you want to avoid logging in to your production instance to pull, you can use a GitHub Action and the n8n API to automatically pull every time you push new work to your production or main branch.
A GitHub Action example:
1 2 3 4 5 6 7 8 9 10 11 12 13 14 15 16 | |
下一步步骤(Next steps)#
了解更多:
🌐 Learn more about: