你的第一个工作流(Your first workflow)#
本指南将向你展示如何在 n8n 中构建一个 工作流,并在过程中解释关键概念。你将会:
🌐 This guide will show you how to construct a workflow in n8n, explaining key concepts along the way. You will:
本快速入门使用 n8n Cloud,推荐新用户使用。提供免费试用——如果你还没有账户,请现在 注册。
🌐 This quickstart uses n8n Cloud, which is recommended for new users. A free trial is available - if you haven't already done so, sign up for an account now.
步骤一:创建一个新的工作流程(Step one: Create a new workflow)#
打开 n8n 时,你会看到以下两种情况之一:
🌐 When you open n8n, you'll see either:
- 一个带有欢迎信息的窗口和两个大按钮:选择从头开始以创建新的工作流程。
- 概览页面上的工作流列表。选择创建工作流以创建新的工作流。
步骤二:添加一个触发节点(Step two: Add a trigger node)#
n8n 提供两种启动工作流的方式:
🌐 n8n provides two ways to start a workflow:
- 手动,通过选择执行工作流。
- 自动使用触发节点作为第一个节点。触发节点根据外部事件或你的设置运行工作流程。
在本教程中,我们将使用 计划触发器。这允许你按计划运行工作流:
🌐 For this tutorial, we'll use the Schedule trigger. This allows you to run the workflow on a schedule:
- 选择 添加第一步。
- 搜索 Schedule。n8n 会显示与搜索匹配的节点列表。
- 选择 Schedule Trigger 将节点添加到画布。n8n 会打开该节点。
- 在 触发间隔 中,选择 周。
- 对于触发器之间的周数,请输入
1。 - 输入时间和日期。在此示例中,在“工作日触发”中选择星期一,在“指定时间触发”中选择上午9点,并在“触发分钟”中输入
0。 - 关闭节点详情视图返回画布。
第三步:添加 NASA 节点并设置凭据(Step three: Add the NASA node and set up credentials)#
该 NASA 节点 与 NASA 的 公共 API 交互以获取有用的数据。我们将使用 API 的实时数据来寻找太阳事件。
🌐 The NASA node interacts with NASA's public APIs to fetch useful data. We will use the real-time data from the API to find solar events.
“凭证”说明 凭证是由应用和服务颁发的私密信息,用于验证你的用户身份,并允许你在应用或服务与 n8n 节点之间连接和共享信息。所需信息的类型因所涉及的应用/服务而异。你在 n8n 外部共享或透露凭证时应小心。
- 在计划触发节点上选择 添加节点
 连接器。
连接器。 - 搜索 NASA。n8n 会显示与搜索匹配的节点列表。
- 选择 NASA 查看操作列表。
- 搜索并选择 获取 DONKI 太阳耀斑。此操作会返回关于近期太阳耀斑的报告。当你选择该操作时,n8n 会将节点添加到画布上并打开它。
- 要访问 NASA API,你需要设置凭据:
- 选择 NASA API 凭证 下拉菜单。
- 选择 创建新凭证。n8n 会打开凭证视图。
- 访问 NASA APIs 并填写 生成 API 密钥 链接中的表格。NASA 网站会生成密钥并将其发送到你输入的邮箱地址。
- 检查你的电子邮件账户以获取 API 密钥。复制该密钥,并将其粘贴到 n8n 的 API Key 中。
- 选择 保存。
- 关闭凭据屏幕。n8n 将返回节点。新的凭据应自动在 NASA API 的凭据 中被选中。
-
默认情况下,DONKI 太阳耀斑提供过去 30 天的数据。要仅限于最近一周,请使用 附加字段:
- 选择 添加字段。
- 选择开始日期。
- 要获取从一周前开始的报告,你可以使用表达式:在 开始日期 旁,选择 表达式 选项卡,然后选择展开按钮
 以打开完整的表达式编辑器。
 - 在 表达式 字段中,输入以下表达式:
This generates a date in the correct format, seven days before the current date.1{{ $today.minus(7, 'days') }}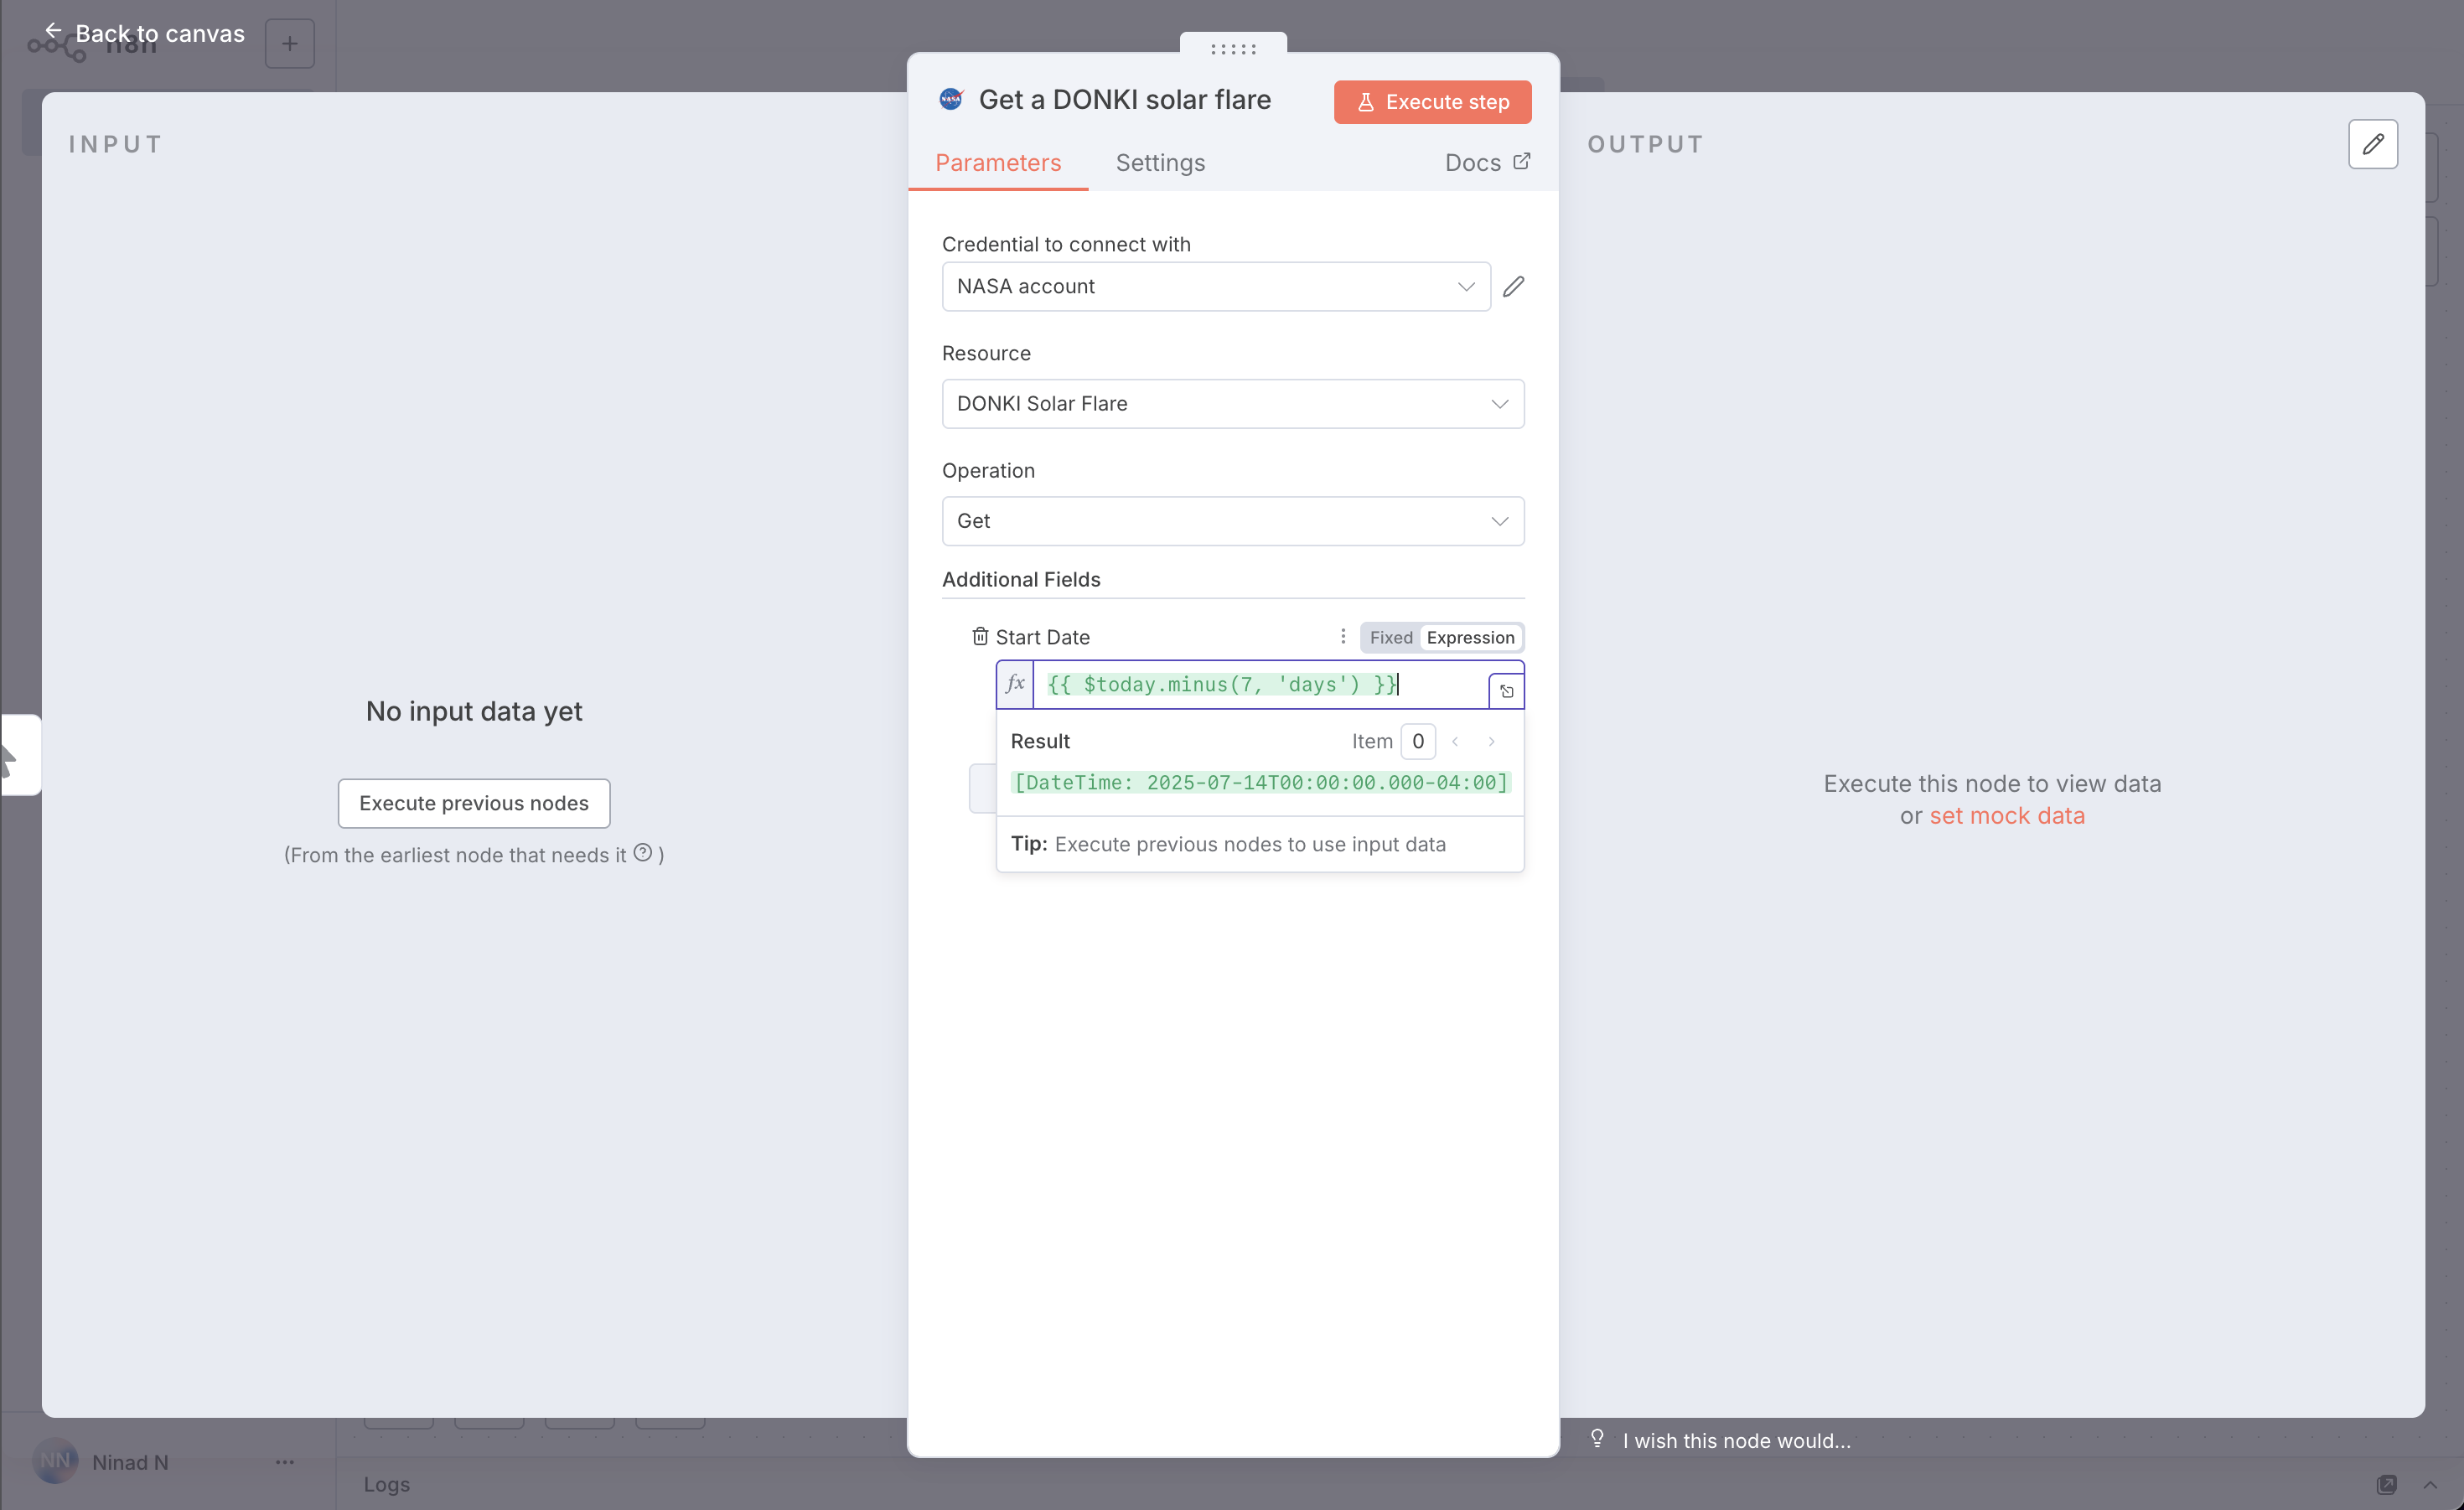
??? 解释 “n8n 中的日期和时间格式...” n8n 使用 Luxon 来处理日期和时间,并且还提供了两个便捷变量:
$now和$today。欲了解更多信息,请参考 表达式 > Luxon。 -
关闭 编辑表达式 模态窗口以返回 NASA 节点。
- 现在你可以检查节点是否正常工作并返回预期的日期:选择 执行步骤 手动运行节点。n8n 会调用 NASA API,并在 输出 部分显示过去七天的太阳耀斑详细信息。
- 关闭 NASA 节点以返回工作流画布。
第四步:使用 If 节点添加逻辑(Step four: Add logic with the If node)#
n8n 在工作流中支持复杂逻辑。在本教程中,我们将使用 If 节点 创建两个分支,每个分支都从 NASA 数据生成一个报告。太阳耀斑有五种可能的分类;我们将添加逻辑,将低级别的分类报告发送到一个输出,高级别的分类发送到另一个输出。
🌐 n8n supports complex logic in workflows. In this tutorial we will use the If node to create two branches that each generate a report from the NASA data. Solar flares have five possible classifications; we will add logic that sends a report with the lower classifications to one output, and the higher classifications to another.
添加条件节点:
🌐 Add the If node:
- 在 NASA 节点上选择 添加节点 连接器。
- 搜索 If。n8n 会显示与搜索匹配的节点列表。
- 选择 If 将节点添加到画布。n8n 会打开该节点。
-
你需要检查 NASA 数据中
classType属性的值。操作步骤如下:-
将 classType 拖到 Value 1。
确保你在前一节中运行了 NASA 节点
如果你没有按照上一节中的步骤运行 NASA 节点,在本步骤中你将看不到任何可用的数据。
-
将比较操作更改为 字符串 > 包含。
- 在值2中输入X。这是太阳耀斑的最高等级。在下一步中,你将创建两个报告:一个针对X级太阳耀斑,另一个针对所有较小的太阳耀斑。
- 您现在可以检查节点是否正常工作并返回预期的日期:选择 执行步骤 来手动运行节点。n8n 会根据条件测试数据,并在 输出 面板中显示哪些结果为真或假。
数周没有大规模太阳耀斑
在本教程中,你将处理实时数据。如果你在运行工作流程时发现没有 X 类太阳耀斑,请尝试将 值 2 中的 X 替换为 A、B、C 或 M。
-
-
确认节点能够返回一些事件后,即可关闭节点返回画布。
第五步:输出工作流程中的数据(Step five: Output data from your workflow)#
工作流程的最后一步是发送关于太阳耀斑的两份报告。在本例中,你将把数据发送到 Postbin。Postbin 是一个接收数据并在临时网页上显示数据的服务。
🌐 The last step of the workflow is to send the two reports about solar flares. For this example, you'll send data to Postbin. Postbin is a service that receives data and displays it on a temporary web page.
- 在 If 节点上,选择标有 true 的 添加节点 连接器。
- 搜索 PostBin。n8n 会显示与搜索匹配的节点列表。
- 选择 PostBin。
- 选择 发送请求。n8n 会将节点添加到画布并打开它。
- 访问 Postbin 并选择 创建存储桶。保持标签页打开,这样在测试工作流程时可以返回。
- 复制 bin ID。它看起来类似于
1651063625300-2016451240051。 - 在 n8n 中,将你的 Postbin ID 粘贴到 Bin ID 中。
- 现在,配置要发送到 Postbin 的数据。在 Bin Content 旁边,选择 Expression 选项卡(你需要将鼠标悬停在 Bin Content 上,选项卡才会出现),然后点击展开按钮 以打开完整的表达式编辑器。
- 现在您可以点击并拖动 If 节点输出中的正确字段到表达式编辑器中,以自动为此标签创建引用。在这种情况下,我们需要的输入是 'classType'。
-
一旦将其放入表达式编辑器,它将变为这个引用:
{{$json["classType"]}}。向它添加一条消息,使完整的表达式为:1There was a solar flare of class {{$json["classType"]}}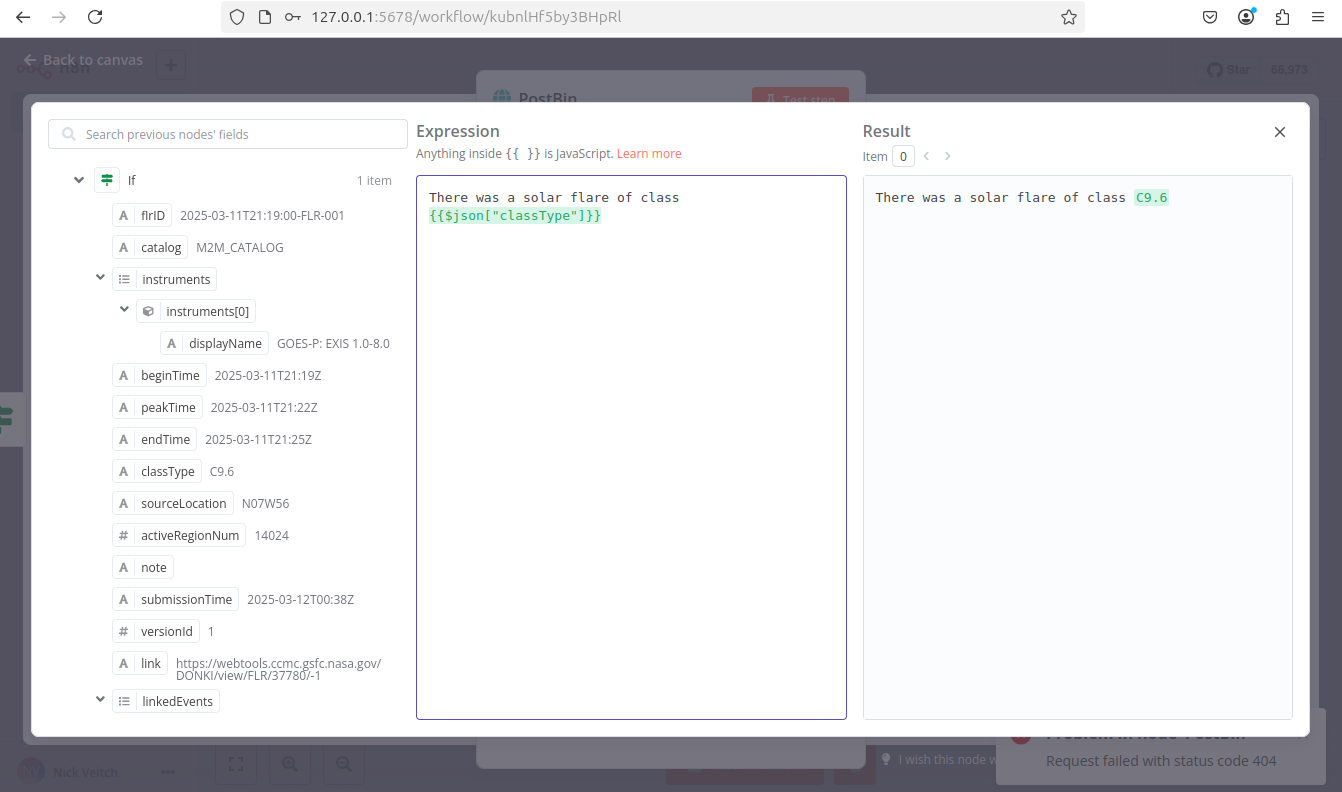
-
关闭表达式编辑器以返回节点。
- 关闭 Postbin 节点以返回画布。
- 添加另一个 Postbin 节点,以处理 If 节点的 false 输出路径:
- 将鼠标悬停在 Postbin 节点上,然后选择 节点上下文菜单
 > 复制节点 来复制第一个 Postbin 节点。
 - 将 If 节点上的false连接器拖到新 Postbin 节点的左侧。
- 将鼠标悬停在 Postbin 节点上,然后选择 节点上下文菜单
第六步:测试工作流程(Step six: Test the workflow)#
- 你现在可以测试整个工作流程。选择 执行工作流程。n8n 会运行工作流程,并显示每个阶段的进度。
- 返回你的 Postbin 存储桶。刷新页面以查看输出。
- 如果你想使用这个工作流程(换句话说,如果你希望它每周自动运行一次),你需要点击 发布 来发布它。
时间限制
Postbin 的存储桶在创建后存在 30 分钟。如果超过此时间限制,你可能需要创建一个新的存储桶,并在 Postbin 节点中更新 ID。
恭喜!(Congratulations)#
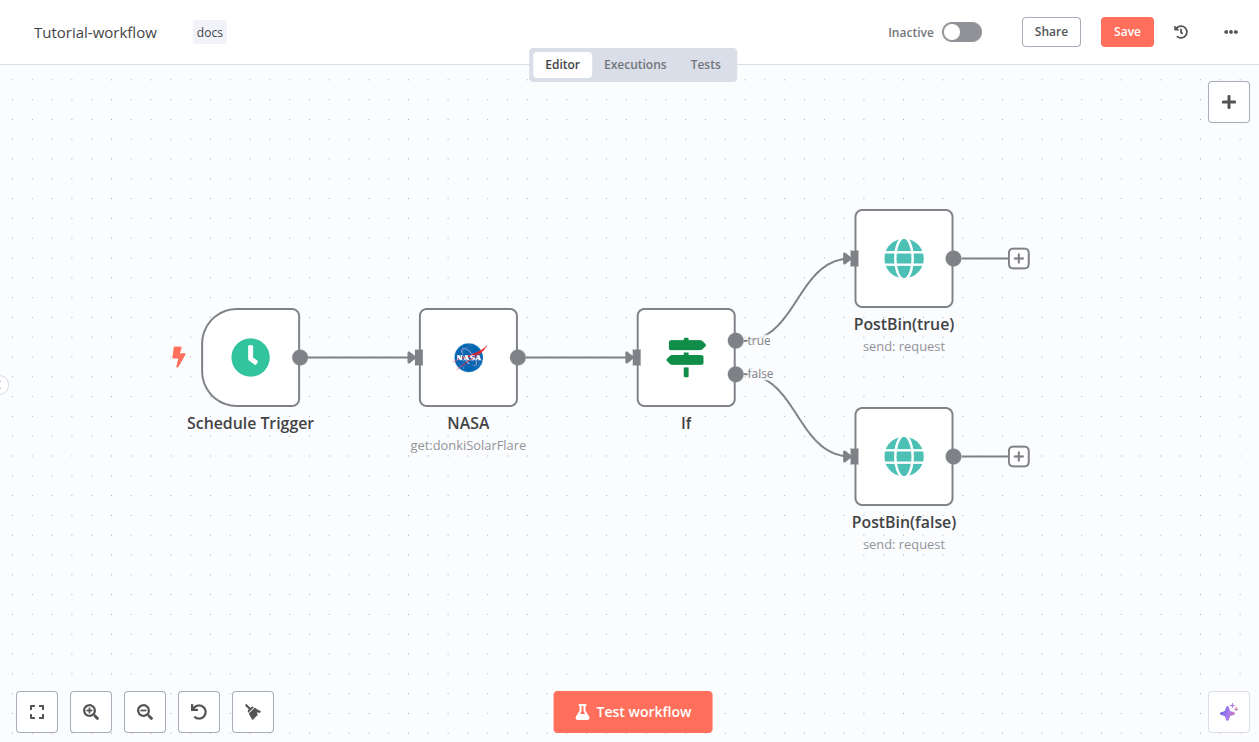
你现在拥有一个完全可用的工作流程,它可以做一些有用的事情!它应该看起来像这样:
🌐 You now have a fully functioning workflow that does something useful! It should look something like this:
Workflow preview placeholder.
在此过程中,你已发现:
🌐 Along the way you have discovered:
- 如何查找所需的节点并将它们连接在一起?
- 如何使用表达式操作数据
- 如何创建凭据并将其附加到节点?
- 如何在工作流中使用逻辑
你可以在此添加许多内容(也许可以添加更多凭证和一个节点来发送结果邮件给你),或者你可能有一个具体的项目在心。不管你的下一步是什么,下面链接的资源应该会有所帮助。
🌐 There are plenty of things you could add to this (perhaps add some more credentials and a node to send you an email of the results), or maybe you have a specific project in mind. Whatever your next steps, the resources linked below should help.
下一步步骤(Next steps)#
- 想知道你可以用人工智能做些什么吗?了解一下 如何使用 n8n 构建 AI 聊天代理。
- 参加 n8n 的 文字课程 或 视频课程。
- 在 工作流模板 中探索更多示例。