在设置 Microsoft Entra ID 应用注册并使用委派访问权限之后,你可以使用凭据覆盖在启动时将客户端 ID 和客户端密钥注入 n8n。这意味着你组织中的用户可以连接到 Microsoft 服务,而无需完成自己的 OAuth 应用注册。
🌐 After setting up a Microsoft Entra ID app registration with delegated access, you can use credential overwrites to inject the Client ID and Client Secret into n8n at startup. This means users in your organisation can connect to Microsoft services without completing their own OAuth app registration.
n8n 支持三种凭证覆盖的环境变量。本指南使用 CREDENTIALS_OVERWRITE_DATA_FILE。有关完整的变量参考,请参阅 Credentials environment variables。
🌐 n8n supports three environment variables for credential overwrites. This guide uses CREDENTIALS_OVERWRITE_DATA_FILE. Refer to Credentials environment variables for the full variable reference.
创建凭据文件(Create the credentials file)
在运行 n8n 的主机上,在与你的 docker-compose.yaml 相同的目录中创建一个名为 credentials-overwrite.json 的文件。
🌐 On the host running n8n, create a file named credentials-overwrite.json in the same directory as your docker-compose.yaml.
该文件包含一个以 n8n 凭证类型名称为键的 JSON 对象。例如,要预先配置 Microsoft Outlook:
🌐 The file contains a JSON object keyed by the n8n credential type name. For example, to pre-configure Microsoft Outlook:
| {
"microsoftOutlookOAuth2Api": {
"clientId": "YOUR_CLIENT_ID",
"clientSecret": "YOUR_CLIENT_SECRET"
}
}
|
要一次预配置多个微软服务,请将每种凭据类型作为单独的键添加:
🌐 To pre-configure multiple Microsoft services at once, add each credential type as a separate key:
| {
"microsoftOutlookOAuth2Api": {
"clientId": "YOUR_CLIENT_ID",
"clientSecret": "YOUR_CLIENT_SECRET"
},
"microsoftOneDriveOAuth2Api": {
"clientId": "YOUR_CLIENT_ID",
"clientSecret": "YOUR_CLIENT_SECRET"
}
}
|
Minified JSON
n8n requires the JSON to be minified (no spaces or newlines). The examples above are formatted for readability. Make sure your actual file contains no extra whitespace:
| {"microsoftOutlookOAuth2Api":{"clientId":"YOUR_CLIENT_ID","clientSecret":"YOUR_CLIENT_SECRET"}}
|
请参阅 集成所需的权限范围 了解每个 Microsoft 服务的凭据类型名称。
🌐 Refer to Required scopes by integration for the credential type name of each Microsoft service.
Docker Compose
将凭证文件以只读卷的方式挂载,并在你的 compose.yaml 中设置环境变量:
🌐 Mount the credentials file as a read-only volume and set the environment variable in your compose.yaml:
1
2
3
4
5
6
7
8
9
10
11
12
13
14
15
16
17
18
19
20
21
22
23
24 | services:
n8n:
image: docker.n8n.io/n8nio/n8n:latest
container_name: n8n
restart: always
ports:
- "5678:5678"
environment:
- GENERIC_TIMEZONE=America/New_York
- TZ=America/New_York
- N8N_ENFORCE_SETTINGS_FILE_PERMISSIONS=true
- N8N_LOG_LEVEL=debug
- N8N_LOG_OUTPUT=file,console
- N8N_LOG_FILE_COUNT_MAX=5
- CREDENTIALS_OVERWRITE_DATA_FILE=/run/secrets/credentials-overwrite.json
volumes:
- n8n_data:/home/node/.n8n
- ./credentials-overwrite.json:/run/secrets/credentials-overwrite.json:ro
networks:
- default
volumes:
n8n_data:
name: ${N8N_VOLUME:-n8n_data}
external: true
|
通过重启容器来应用更改:
🌐 Apply the changes by restarting the container:
验证覆盖是否已应用(Verify the overwrite is applied)
在 n8n 启动后,让用户为其中一个预配置的服务(例如 Microsoft Outlook)创建一个新的凭证。他们应该在凭证选择中看到 托管 OAuth2(推荐) 选项。
🌐 After n8n starts, have a user create a new credential for one of the pre-configured services (for example, Microsoft Outlook). They should see a Managed OAuth2 (recommended) option in the credential selection.
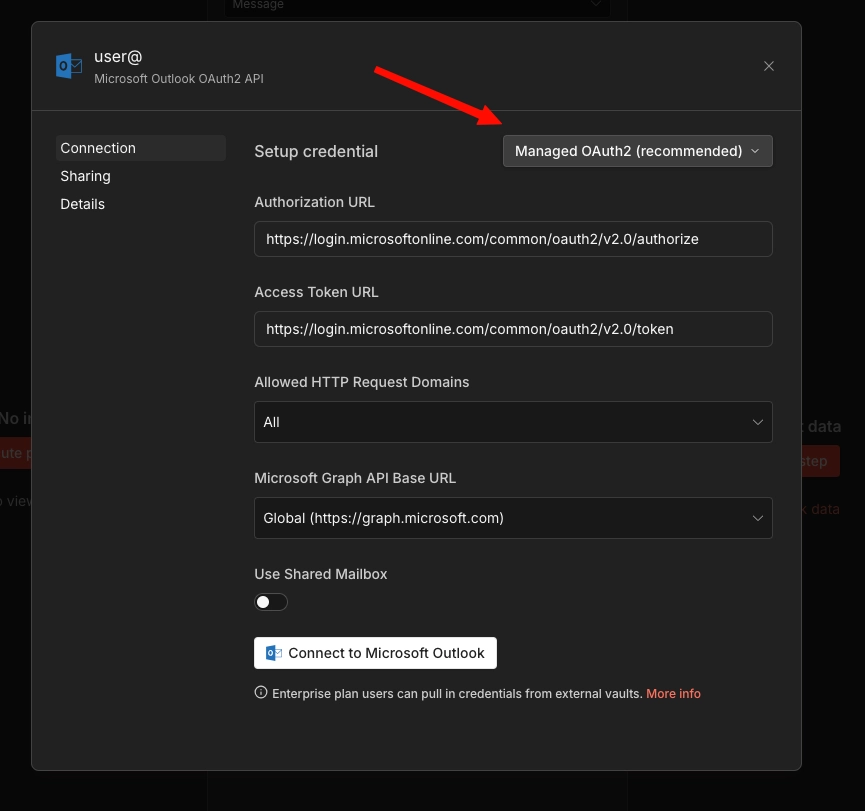
用户可以点击 连接到 Microsoft Outlook,无需身份验证。应出现 账户已连接 消息
🌐 The user can click Connect to Microsoft Outlook, with no auth required. An Account connected message should appear
如果没有出现 Managed OAuth 2 选项,则说明环境变量未正确应用。请检查卷挂载中的文件路径是否与 CREDENTIALS_OVERWRITE_DATA_FILE 的值匹配。
🌐 If the Managed OAuth 2 option doesn't appear, the environment variable wasn't applied correctly. Check that the file path in the volume mount matches the value of CREDENTIALS_OVERWRITE_DATA_FILE.
Kubernetes
对于 Kubernetes 部署,请将 Docker 卷挂载替换为 Kubernetes 原生原语。具体方法因云提供商而异。请选择与你的环境匹配的部分。
🌐 For Kubernetes deployments, replace the Docker volume mount with Kubernetes-native primitives. The approach differs by cloud provider. Choose the section that matches your environment.
普通 Kubernetes Secret(EKS / AKS / GKE)(Plain Kubernetes Secret (EKS / AKS / GKE))
这种方法适用于所有三种托管的 Kubernetes 提供商,无需额外的依赖。
🌐 This approach works across all three managed Kubernetes providers without additional dependencies.
1. 创建秘密:
| apiVersion: v1
kind: Secret
metadata:
name: n8n-credentials-overwrite
namespace: your-namespace
type: Opaque
stringData:
credentials-overwrite.json: '{"microsoftOutlookOAuth2Api":{"clientId":"YOUR_CLIENT_ID","clientSecret":"YOUR_CLIENT_SECRET"}}'
|
2. 在你的部署中挂载 Secret:
 1
 2
 3
 4
 5
 6
 7
 8
 9
10
11
12
13
14
15
16
17 | spec:
containers:
- name: n8n
image: docker.n8n.io/n8nio/n8n:latest
env:
- name: CREDENTIALS_OVERWRITE_DATA_FILE
value: /run/secrets/credentials-overwrite.json
# ...your other env vars
volumeMounts:
- name: credentials-overwrite
mountPath: /run/secrets/credentials-overwrite.json
subPath: credentials-overwrite.json
readOnly: true
volumes:
- name: credentials-overwrite
secret:
secretName: n8n-credentials-overwrite
|
subPath 字段非常重要。没有它,Kubernetes 会替换整个 /run/secrets/ 目录,而不是只挂载单个文件。
🌐 The subPath field is important. Without it, Kubernetes replaces the entire /run/secrets/ directory rather than mounting just the single file.
Alternative: inline environment variable
To skip the volume mount entirely, reference the Secret directly as an environment variable:
| env:
- name: CREDENTIALS_OVERWRITE_DATA valueFrom: secretKeyRef: name: n8n-credentials-overwrite key: credentials-overwrite.json
|
| stringData:
credentials-json: '{"microsoftOutlookOAuth2Api":{"clientId":"...","clientSecret":"..."}}'
|
This is cleaner for single-service setups, but note that some Kubernetes environments restrict environment variable size (for example, to 128KB per variable). The file-based approach is safer if you have many credential overwrites.
AWS 密钥管理器(EKS)(AWS Secrets Manager (EKS))
这种方法使用 AWS Secrets Store CSI Driver 将 AWS Secrets Manager 中的密钥直接挂载到 Pod 中。它增加了轮换支持、CloudTrail 审计日志记录以及集中式密钥管理。
🌐 This approach uses the AWS Secrets Store CSI Driver to mount a secret from AWS Secrets Manager directly into the pod. It adds rotation support, CloudTrail audit logging, and centralised secret management.
先决条件:
- 在集群上安装了 Secrets Store CSI 驱动程序和 ASCP(AWS Secrets 和配置提供程序)
- 为集群配置的 IAM OIDC 提供程序(IRSA 所需)
- 具有
secretsmanager:GetSecretValue 和 secretsmanager:DescribeSecret 权限的 IAM 角色
1. 在 AWS Secrets Manager 中创建密钥:
| aws secretsmanager create-secret \
--name n8n/credentials-overwrite \
--description "n8n credential overwrites for Microsoft OAuth" \
--secret-string '{"microsoftOutlookOAuth2Api":{"clientId":"YOUR_CLIENT_ID","clientSecret":"YOUR_CLIENT_SECRET"}}'
|
2. 创建一个 IAM 策略:
1
2
3
4
5
6
7
8
9
10
11
12
13 | {
"Version": "2012-10-17",
"Statement": [
{
"Effect": "Allow",
"Action": [
"secretsmanager:GetSecretValue",
"secretsmanager:DescribeSecret"
],
"Resource": "arn:aws:secretsmanager:REGION:ACCOUNT_ID:secret:n8n/credentials-overwrite-*"
}
]
}
|
| aws iam create-policy \
--policy-name n8n-credentials-overwrite-read \
--policy-document file://policy.json
|
3. 使用 IRSA 创建服务账户:
| eksctl create iamserviceaccount \
--name n8n-sa \
--namespace your-namespace \
--cluster your-cluster \
--attach-policy-arn arn:aws:iam::ACCOUNT_ID:policy/n8n-credentials-overwrite-read \
--approve
|
4. 创建 SecretProviderClass:
1
2
3
4
5
6
7
8
9
10
11
12 | apiVersion: secrets-store.csi.x-k8s.io/v1
kind: SecretProviderClass
metadata:
name: n8n-credentials-overwrite
namespace: your-namespace
spec:
provider: aws
parameters:
objects: |
- objectName: "n8n/credentials-overwrite"
objectType: "secretsmanager"
objectAlias: "credentials-overwrite.json"
|
5. 更新你的 n8n 部署:
 1
 2
 3
 4
 5
 6
 7
 8
 9
10
11
12
13
14
15
16
17
18
19
20
21
22
23
24
25
26
27 | apiVersion: apps/v1
kind: Deployment
metadata:
name: n8n
namespace: your-namespace
spec:
template:
spec:
serviceAccountName: n8n-sa
containers:
- name: n8n
image: docker.n8n.io/n8nio/n8n:latest
env:
- name: CREDENTIALS_OVERWRITE_DATA_FILE
value: /run/secrets/credentials-overwrite.json
volumeMounts:
- name: credentials-overwrite
mountPath: /run/secrets/credentials-overwrite.json
subPath: credentials-overwrite.json
readOnly: true
volumes:
- name: credentials-overwrite
csi:
driver: secrets-store.csi.k8s.io
readOnly: true
volumeAttributes:
secretProviderClass: n8n-credentials-overwrite
|
轮换秘密:
要更新凭据,请在 Secrets Manager 中更新该值:
🌐 To update the credentials, update the value in Secrets Manager:
| aws secretsmanager update-secret \
--secret-id n8n/credentials-overwrite \
--secret-string '{"microsoftOutlookOAuth2Api":{"clientId":"NEW_CLIENT_ID","clientSecret":"NEW_CLIENT_SECRET"}}'
|
CSI 驱动程序会在其轮询间隔(默认两分钟)同步更新的值。重新启动 n8n pod 以便 n8n 读取更新后的文件,因为 n8n 在启动时会读取凭证文件。
🌐 The CSI driver syncs the updated value on its polling interval (default two minutes). Restart the n8n pod for n8n to read the updated file, as n8n reads the credentials file at startup.
Azure 密钥保管库 (AKS)(Azure Key Vault (AKS))
这种方法使用 Azure Key Vault Provider for the Secrets Store CSI Driver 将来自 Azure Key Vault 的机密挂载到 Pod 中。
🌐 This approach uses the Azure Key Vault Provider for the Secrets Store CSI Driver to mount secrets from Azure Key Vault into the pod.
先决条件:
- AKS 集群上已启用 Secrets Store CSI 驱动程序和 Azure Key Vault 提供程序插件
- 一个 Azure 密钥保管实例
- 具有访问该保管库权限的托管身份或服务主体
- 集群已启用工作负载身份(推荐优于 Pod 身份)
1. 创建或使用现有的密钥保管库:
| az keyvault create \
--name n8n-credentials-vault \
--resource-group your-resource-group \
--location your-region
|
2. 在密钥保管库中创建密钥:
| az keyvault secret set \
--vault-name n8n-credentials-vault \
--name n8n-credentials-overwrite \
--value '{"microsoftOutlookOAuth2Api":{"clientId":"YOUR_CLIENT_ID","clientSecret":"YOUR_CLIENT_SECRET"}}'
|
3. 设置工作负载身份:
创建托管身份并建立联合凭据:
🌐 Create a managed identity and establish the federated credential:
1
2
3
4
5
6
7
8
9
10
11
12
13
14
15
16
17
18
19
20
21
22
23
24
25
26
27
28
29
30
31 | # Create a managed identity
az identity create \
--name n8n-workload-identity \
--resource-group your-resource-group \
--location your-region
# Get the identity client ID
CLIENT_ID=$(az identity show \
--name n8n-workload-identity \
--resource-group your-resource-group \
--query clientId -o tsv)
# Grant the identity access to the Key Vault
az keyvault set-policy \
--name n8n-credentials-vault \
--secret-permissions get \
--spn "$CLIENT_ID"
# Get the OIDC issuer URL for your cluster
OIDC_ISSUER=$(az aks show \
--name your-cluster \
--resource-group your-resource-group \
--query "oidcIssuerProfile.issuerUrl" -o tsv)
# Create the federated credential
az identity credential create \
--name n8n-workload-identity \
--resource-group your-resource-group \
--issuer "$OIDC_ISSUER" \
--subject system:serviceaccount:your-namespace:n8n-sa \
--audience api://AzureADTokenExchange
|
4. 创建 Kubernetes 服务账户:
| apiVersion: v1
kind: ServiceAccount
metadata:
name: n8n-sa
namespace: your-namespace
annotations:
azure.workload.identity/client-id: "YOUR_MANAGED_IDENTITY_CLIENT_ID"
labels:
azure.workload.identity/use: "true"
|
5. 创建 SecretProviderClass:
 1
 2
 3
 4
 5
 6
 7
 8
 9
10
11
12
13
14
15
16
17
18
19 | apiVersion: secrets-store.csi.x-k8s.io/v1
kind: SecretProviderClass
metadata:
name: n8n-credentials-overwrite
namespace: your-namespace
spec:
provider: azure
parameters:
usePodIdentity: "false"
useWorkloadIdentity: "true"
clientID: "YOUR_MANAGED_IDENTITY_CLIENT_ID"
keyvaultName: "n8n-credentials-vault"
objects: |
array:
- |
objectName: n8n-credentials-overwrite
objectType: secret
objectAlias: credentials-overwrite.json
tenantId: "YOUR_TENANT_ID"
|
6. 更新你的 n8n 部署:
1
2
3
4
5
6
7
8
9
10
11
12
13
14
15
16
17
18
19
20
21
22
23
24
25
26
27 | apiVersion: apps/v1
kind: Deployment
metadata:
name: n8n
namespace: your-namespace
spec:
template:
spec:
serviceAccountName: n8n-sa
containers:
- name: n8n
image: docker.n8n.io/n8nio/n8n:latest
env:
- name: CREDENTIALS_OVERWRITE_DATA_FILE
value: /run/secrets/credentials-overwrite.json
volumeMounts:
- name: credentials-overwrite
mountPath: /run/secrets/credentials-overwrite.json
subPath: credentials-overwrite.json
readOnly: true
volumes:
- name: credentials-overwrite
csi:
driver: secrets-store.csi.k8s.io
readOnly: true
volumeAttributes:
secretProviderClass: n8n-credentials-overwrite
|
轮换秘密:
| az keyvault secret set \
--vault-name n8n-credentials-vault \
--name n8n-credentials-overwrite \
--value '{"microsoftOutlookOAuth2Api":{"clientId":"NEW_CLIENT_ID","clientSecret":"NEW_CLIENT_SECRET"}}'
|
CSI 驱动程序根据其轮询间隔(默认两分钟)进行同步。之后重新启动 n8n Pod,让 n8n 获取更新的文件。
🌐 The CSI driver syncs on its polling interval (default two minutes). Restart the n8n pod afterward for n8n to pick up the updated file.
谷歌秘密管理器(GKE)(Google Secret Manager (GKE))
这种方法使用 Secrets Store CSI 驱动的 GCP 提供程序 将 Google Secret Manager 中的密钥挂载到 Pod 中。
🌐 This approach uses the GCP provider for the Secrets Store CSI Driver to mount secrets from Google Secret Manager into the pod.
先决条件:
- 启用了工作负载身份联合的 GKE 集群
- 项目上启用了 Secret Manager API
- 具有
secretmanager.secretAccessor 角色的 Google 服务账号
1. 启用秘密管理器 API:
| gcloud services enable secretmanager.googleapis.com \
--project your-project-id
|
2. 创建秘密:
| echo -n '{"microsoftOutlookOAuth2Api":{"clientId":"YOUR_CLIENT_ID","clientSecret":"YOUR_CLIENT_SECRET"}}' | \
gcloud secrets create n8n-credentials-overwrite \
--data-file=- \
--project your-project-id
|
3. 设置工作负载身份联合:
1
2
3
4
5
6
7
8
9
10
11
12
13
14
15
16 | # Create a Google service account
gcloud iam service-accounts create n8n-secret-reader \
--display-name="n8n Secret Reader" \
--project your-project-id
# Grant it access to the secret
gcloud secrets add-iam-policy-binding n8n-credentials-overwrite \
--member="serviceAccount:n8n-secret-reader@your-project-id.iam.gserviceaccount.com" \
--role="roles/secretmanager.secretAccessor" \
--project your-project-id
# Bind the Kubernetes service account to the Google service account
gcloud iam service-accounts add-iam-policy-binding \
n8n-secret-reader@your-project-id.iam.gserviceaccount.com \
--role="roles/iam.workloadIdentityUser" \
--member="serviceAccount:your-project-id.svc.id.goog[your-namespace/n8n-sa]"
|
4. 创建 Kubernetes 服务账户:
| apiVersion: v1
kind: ServiceAccount
metadata:
name: n8n-sa
namespace: your-namespace
annotations:
iam.gke.io/gcp-service-account: n8n-secret-reader@your-project-id.iam.gserviceaccount.com
|
5. 安装 CSI 驱动程序和 GCP 提供程序:
| # Install the CSI driver
helm repo add secrets-store-csi-driver https://kubernetes-sigs.github.io/secrets-store-csi-driver/charts
helm install csi-secrets-store secrets-store-csi-driver/secrets-store-csi-driver \
--namespace kube-system
# Install the GCP provider
kubectl apply -f https://raw.githubusercontent.com/GoogleCloudPlatform/secrets-store-csi-driver-provider-gcp/main/deploy/provider-gcp-plugin.yaml
|
6. 创建 SecretProviderClass:
| apiVersion: secrets-store.csi.x-k8s.io/v1
kind: SecretProviderClass
metadata:
name: n8n-credentials-overwrite
namespace: your-namespace
spec:
provider: gcp
parameters:
secrets: |
- resourceName: "projects/your-project-id/secrets/n8n-credentials-overwrite/versions/latest"
path: "credentials-overwrite.json"
|
7. 更新你的 n8n 部署:
1
2
3
4
5
6
7
8
9
10
11
12
13
14
15
16
17
18
19
20
21
22
23
24
25
26
27 | apiVersion: apps/v1
kind: Deployment
metadata:
name: n8n
namespace: your-namespace
spec:
template:
spec:
serviceAccountName: n8n-sa
containers:
- name: n8n
image: docker.n8n.io/n8nio/n8n:latest
env:
- name: CREDENTIALS_OVERWRITE_DATA_FILE
value: /run/secrets/credentials-overwrite.json
volumeMounts:
- name: credentials-overwrite
mountPath: /run/secrets/credentials-overwrite.json
subPath: credentials-overwrite.json
readOnly: true
volumes:
- name: credentials-overwrite
csi:
driver: secrets-store.csi.k8s.io
readOnly: true
volumeAttributes:
secretProviderClass: n8n-credentials-overwrite
|
轮换秘密:
创建秘密的新版本:
🌐 Create a new version of the secret:
| echo -n '{"microsoftOutlookOAuth2Api":{"clientId":"NEW_CLIENT_ID","clientSecret":"NEW_CLIENT_SECRET"}}' | \
gcloud secrets versions add n8n-credentials-overwrite \
--data-file=- \
--project your-project-id
|
因为 SecretProviderClass 引用了 versions/latest,CSI 驱动会在下一次同步时获取新版本。重启 n8n Pod 以便 n8n 读取更新后的文件。
🌐 Because the SecretProviderClass references versions/latest, the CSI driver picks up the new version on its next sync. Restart the n8n pod for n8n to read the updated file.